Getting Up and Running with Apiman
In this section, we’ll also take a very hands-on look at Apiman.
In about 10 minutes, we’ll get Apiman installed and running, define an API policy, create and publish an API, register an application, and watch Apiman enforce that policy.
Apiman Docker Compose distro
The easiest way to try Apiman is with our Docker Compose distribution. It is also arranged in a way that is more representative of a real-world deployment; broken down into its constituent parts, with all features enabled, and using a production-grade database.
-
Download the Apiman Docker Compose distribution.
-
unzip apiman-docker-compose-3.2.0-SNAPSHOT.zip && cd apiman-docker-compose-3.2.0-SNAPSHOT -
docker-compose -f docker-compose.setup.yml up -
docker-compose up -
🎉 Success!
|
If you use this approach, you can skip straight to How Apiman Works.
WildFly Bare Metal distro: prerequisites
You can run Apiman on any operating system that supports Java 11+.
We don’t need very much in the way of prerequisite software to run Apiman out of the box.
What you will need to install to run Apiman and follow all the steps in this chapter are:
-
Java: Apiman can run Java version 11 or newer. You will want to install the full Java JDK. You can use either OpenJDK or Oracle’s JDK.
-
Apache Maven: While you do not need the Maven build tool to run Apiman, we will use it to build an example API.
We don’t need very much to run Apiman out of the box.
You’ll also need to install git and Maven installed to be able to build the example API.
After you install the prerequisite software, the next thing to do is get a copy of Apiman.
Getting the Bits - Downloading Apiman
To download Apiman, open a browser and navigate to www.apiman.io
Apiman is distributed in multiple forms. We’ll examine and use each of these forms in this book:
-
Docker Compose: In this distribution, Apiman is packaged as a series of Docker images pre-configured to make it easy to get started with almost zero effort.
-
Apiman WildFly: In this distribution, Apiman is packaged in a zip file that is installed over a WildFly server.
Apiman WildFly distribution
If you navigate to the “downloads” page, you’ll see:
Let’s take a look at the contents of the WildFly Overlay.
There are three main directories in the WildFly Overlay:
The Apiman directory - This directory contains configuration data specific to Apiman such as the DDL (Data Description Language) files that define database schemas used by Apiman, JSON files that define policy and security settings, and a quickstart example program that we will use as an example API. The Apiman directory is a new directory that is created when you unzip the WildFly Overlay file.
The top level directories in the Apiman directory look like this:
├── apiman
│   ├── data
│   │   ├── all-policyDefs.json
│   │   └── apiman-realm.json
│   ├── ddls
│   │   ├── apiman_mysql8.ddl
│   │   └── apiman_postgresql9.ddl
│   ├── quickstarts
│   │   ├── echo-service
│   │   ├── LICENSE
│   │   ├── pom.xml
│   │   └── README.md
The modules directory - This directory contains configuration files, including Keycloak (URL) configuration files that are added to the WildFly server for Apiman. These files are added to the WildFly “standalone” server configuration.
The top levels in this directory look like this:
├── modules
│   └── system
│       └── layers
└── standalone
 ├── configuration
 │   ├── apiman.jks
 │   ├── apiman.properties
 │   ├── keycloak-server.json
 │   ├── providers
 │   ├── standalone-apiman.xml
 │   ├── standalone-keycloak.xml
 │   └── themes
 ├── data
 │   ├── h2
 │   └── keycloak.h2.db
The deployments directory - this directory contains the Apiman API Gateway, back end APIs, and Apiman Management UI, packaged as .war files.
By unzipping the WildFly Overlay file, these .war files are deployed to the WildFly server.
The top levels in this directory look like this:
├── deployments
     ├── apiman-gateway-api.war
     ├── apiman-gateway.war
     ├── apimanui.war
     └── apiman.war
Make a mental note of these Apiman deployment files. We’ll see them again in a few minutes.
Installing Apiman on a WildFly Server
The steps you follow are:
-
Download and unzip the WildFly Server:
-
unzip the file into the directory in which you want to run the sever.
-
Download the Apiman WildFly overlay zip:
-
unzipthe overlay directly over the WildFly directory. This will install Apiman into the WildFly server you created in the previous step.
The commands that you will execute to install the server will look something like this:
mkdir ~/apiman-3.2.0-SNAPSHOT
cd ~/apiman-3.2.0-SNAPSHOT
wget https://download.jboss.org/wildfly/23.0.2.Final/wildfly-23.0.2.Final.zip
wget https://github.com/apiman/apiman/releases/download/3.2.0-SNAPSHOT/apiman-distro-wildfly-3.2.0-SNAPSHOT-overlay.zip
unzip wildfly-23.0.2.Final
unzip -o apiman-distro-wildfly-3.2.0-SNAPSHOT-overlay.zip -d wildfly-23.0.2.Final
Before we move on, we have one server administration task to perform. We have to create a server user, so that we can log onto the server administrative console. This is necessary as WildFly does not come pre-installed with any users.
To create a new server user, navigate to this directory:
cd apiman-3.2.0-SNAPSHOT/wildfly-23.0.2.Final/binAnd execute this script:
./add-user.shWhen you are prompted for the type of user to create, select Management User:
What type of user do you wish to add?
a) Management User (mgmt-users.properties)
b) Application User (application-users.properties)
(a):
After you define a username and password, for the remainder of the prompts, you can safely take the default values, or select “yes” to complete the creation of a user account.
Details on the administration of a WildFly server, including user management, are out of scope for this book as our focus is Apiman. If you are interested in learning more about WildFly server administration, refer to the WildFly Server Administration Guide.
Running the WildFly Server
To start the WildFly server, navigate back to the directory into which you installed the server, execute these commands:
cd apiman-3.2.0-SNAPSHOT/wildfly-23.0.2.Final
./bin/standalone.sh -c standalone-apiman.xml
When the server starts, it will write logging messages (a lot of messages!) to the screen.
When you see some messages that look like this, you’ll know that the server is up and running with Apiman installed:
"apiman-gateway.war")
23:28:49,091 INFO  [org.jboss.as] (Controller Boot Thread) WFLYSRV0060: Http management interface listening on http://127.0.0.1:9990/management
23:28:49,091 INFO  [org.jboss.as] (Controller Boot Thread) WFLYSRV0051: Admin console listening on http://127.0.0.1:9990
23:28:49,091 INFO  [org.jboss.as] (Controller Boot Thread) WFLYSRV0025: WildFly Full 23.0.2.Final started in 11891ms - Started 1131 of 1543 services (616 services are lazy, passive or on-demand)
Apiman Manager and Apiman Gateway have a status endpoint at /apiman/system/status which you can query to determine when the platform has fully booted.
|
Testing the Installation
Congratulations! Your WildFly server is up and running with Apiman installed!
Or is it?
Let’s take a quick look at how we can be sure that the server installation was correct. To do this, we’ll look in two places.
First, we’ll look at the WildFly Server Administrative Console.
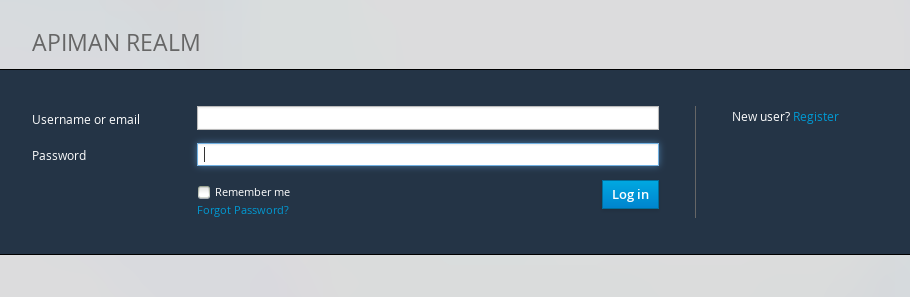
Remember the user account that we created? We’ll use it now. To access the WildFly Server Administrative Console, open up a browser, and navigate to: localhost:8080
This page will be displayed:

When you select the Administration Console selection, you will be prompted for the username and password:
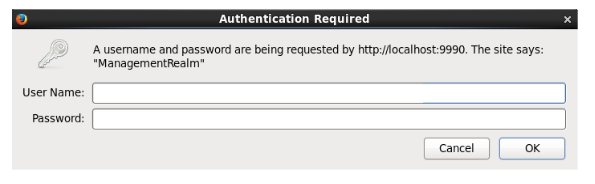
Enter the username and password for the user that you defined (for this example, we used the very unimaginative and insecure username “admin”) and you will be brought to the WildFly Server Administration Console:
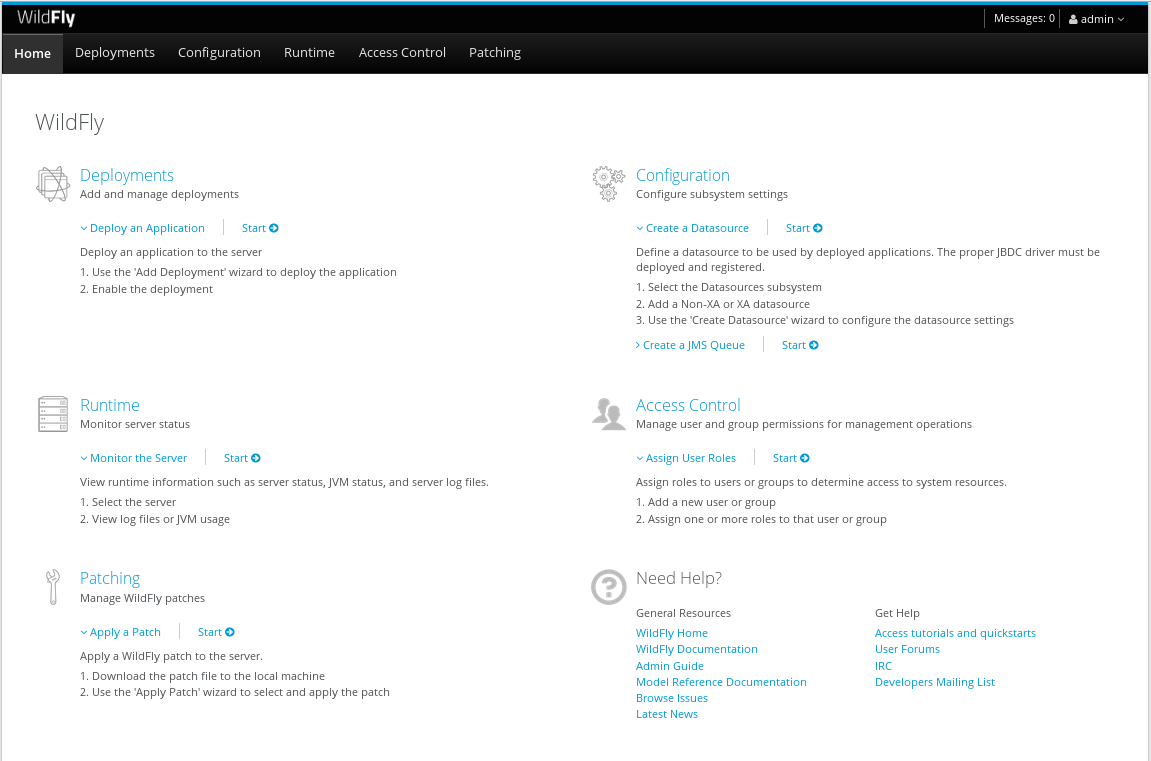
If you then select the “Deployments” tab at the top of the page, you’ll see the applications deployed to the server. This is where you should see the Apiman deployments for the APIs, Gateway, and Management UI:
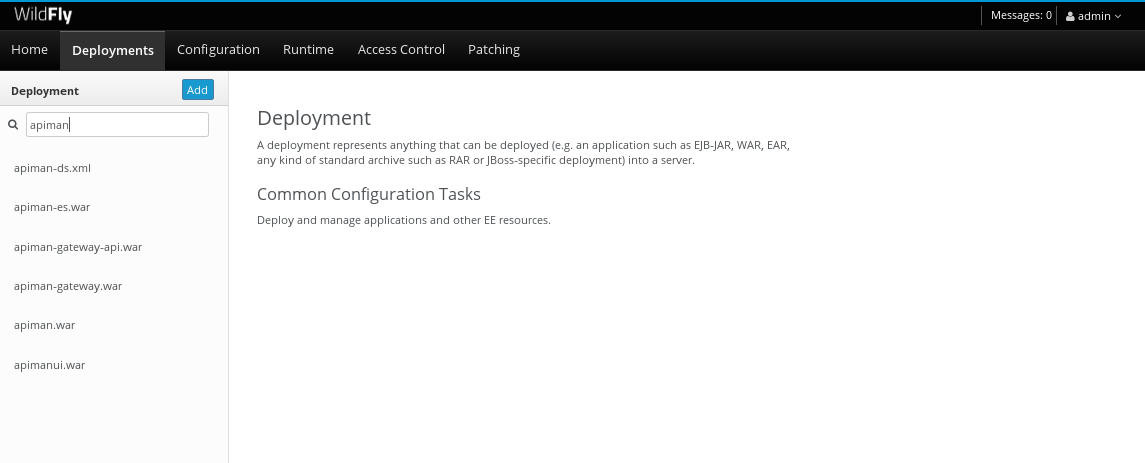
If you don’t see the Apiman deployments, don’t panic, but something went wrong with the installation.
The most common reason for the Apiman deployments to be missing is that you unzipped the Apiman overlay .zip file into a different directory from the WildFly server. The overlay must be unzipped over an installed WildFly server.
You can confirm that this is what happened by looking in the WildFly server’s deployment directory here: wildfly-23.0.2.Final/standalone/deployments
If you look in this directory, you should see these files (the presence of files with the “.deployed” suffix indicates that the corresponding file was deployed successfully):
apiman-gateway-api.war
apiman-gateway-api.war.deployed
apiman-gateway.war
apiman-gateway.war.deployed
apimanui.war
apimanui.war.deployed
apiman.war
apiman.war.deployed
So, if you don’t see the Apiman deployments, stop the server and start the installation over.
Be careful to unzip the Apiman overlay file directly over the directory created when you unzipped the WildFly server .zip file.
The second place we’ll look for evidence that the installation was successful is the WildFly server’s server.log file.
The WildFly server’s server.log file is created when the server is started. All the information that is displayed on the screen when you started the server is also written to the log file.
The level of detail written to the console and the log file is configurable. You can read more about configuring WildFly logging on the WildFly Administrator’s Guide.
You can find the WildFly server file in: wildfly-23.0.2.Final/standalone/log/server.log
The WildFly server log file can be quite large as the server will append more logging statements to it over time.
While you can certainly read the entire file anytime you want, we’ll focus on some highlights related to ensuring that the server started cleanly. An obvious first step is to search the file for logging statements written at the ERROR level. If the file does not contain any errors, you can look for statements that look like this to confirm that the server started cleanly:
23:28:48,978 INFO  [org.wildfly.extension.undertow] (ServerService Thread Pool -- 71) WFLYUT0021: Registered web context: /apiman-es
23:28:49,000 INFO  [org.jboss.as.server] (ServerService Thread Pool -- 36) WFLYSRV0010: Deployed "apiman-gateway-api.war" (runtime-name : "apiman-gateway-api.war")
23:28:48,999 INFO  [org.jboss.as.server] (ServerService Thread Pool -- 60) WFLYSRV0010: Deployed "keycloak-server.war" (runtime-name : "keycloak-server.war")
23:28:49,000 INFO  [org.jboss.as.server] (ServerService Thread Pool -- 36) WFLYSRV0010: Deployed "apiman.war" (runtime-name : "apiman.war")
23:28:49,000 INFO  [org.jboss.as.server] (ServerService Thread Pool -- 36) WFLYSRV0010: Deployed "apiman-es.war" (runtime-name : "apiman-es.war")
23:28:49,001 INFO  [org.jboss.as.server] (ServerService Thread Pool -- 36) WFLYSRV0010: Deployed "apiman-ds.xml" (runtime-name : "apiman-ds.xml")
23:28:49,001 INFO  [org.jboss.as.server] (ServerService Thread Pool -- 36) WFLYSRV0010: Deployed "apimanui.war" (runtime-name : "apimanui.war")
23:28:49,001 INFO  [org.jboss.as.server] (ServerService Thread Pool -- 36) WFLYSRV0010: Deployed "services.war" (runtime-name : "services.war")
23:28:49,001 INFO  [org.jboss.as.server] (ServerService Thread Pool -- 36) WFLYSRV0010: Deployed "authtest-ds.xml" (runtime-name : "authtest-ds.xml")23:28:49,001 INFO  [org.jboss.as.server] (ServerService Thread Pool -- 36) WFLYSRV0010: Deployed "apiman-gateway.war" (runtime-name :
That’s right, it’s the same Apiman deployment files. If you see statements like these, and there are no ERROR statements, then you should be able to safely access the WildFly Administration console.
There’s just more point we should cover before moving on.
While the server may be up and running, it’s not really configured for production use.
As a convenience, when you install Apiman, it is preconfigured with a default administrator account.
The username for this account is admin and the password is admin123! - not exactly a mission critical level of security!
If this were a production server, the first thing that we’d do is to change the default Apiman admin username and password. Apiman is configured by default to use Keycloak for password security and user management. Also, the default database used by Apiman to store contract and API information is the H2 in-memory database.
For a production server, you’d want to reconfigure this to use a production database. We’ll cover Apiman server security and production configuration settings in later chapters.
The source code for the example service is contained in a git repo (git-scm.com) hosted at GitHub (github.com/apiman). To download a copy of the example service, navigate to the directory in which you want to build the service and execute this git command:
git clone git@github.com:apiman/apiman-quickstarts.git
As the source code is downloading, you’ll see output that looks like this:
git clone git@github.com:apiman/apiman-quickstarts.git
Initialized empty Git repository in apiman-quickstarts/.git/
remote: Counting objects: 104, done.
remote: Total 104 (delta 0), reused 0 (delta 0)
Receiving objects: 100% (104/104), 18.16 KiB, done.
Resolving deltas: 100% (40/40), done.
The source code for the example API is provided in the wildfly-23.0.2.Final/apiman/quickstarts directory.
The echo-API quickstart includes these files:
And, after the download is complete, you’ll see a populated directory tree that looks like this:
└── apiman-quickstarts
	├── echo-service
	│   ├── pom.xml
	│   ├── README.md
	│   └── src
	│   	└── main
	│       	├── java
	│       	│   └── io
	│       	│   	└── apiman
	│       	│       	└── quickstarts
	│       	│           	└── echo
	│       	│               	├── EchoResponse.java
	│       	│               	└── EchoServlet.java
	│       	└── webapp
	│           	└── WEB-INF
	│               	├── jboss-web.xml
	│               	└── web.xml
	├── LICENSE
	├── pom.xml
	├── README.md
	├── release.sh
	└── src
 	└── main
     	└── assembly
         	└── dist.xml
As we mentioned earlier, the example API is very simple. The only action that the API performs is to echo back in responses the metadata in the REST requests that it receives.
Maven is used to build the API. To build the API into a deployable .war file, navigate to the directory into which you downloaded the API example:
cd apiman-quickstarts/echo-serviceAnd then execute this maven command:
mvn packageAs the API is being built into a .war file, you’ll see output that looks like this:
[INFO] Scanning for projects...
[INFO]
[INFO] ------------------------------------------------------------------------
[INFO] Building apiman-quickstarts-echo-service 1.2.4-SNAPSHOT
[INFO] ------------------------------------------------------------------------
[INFO]
[INFO] --- maven-resources-plugin:2.7:resources (default-resources) @ apiman-quickstarts-echo-service ---
[INFO] Using 'UTF-8' encoding to copy filtered resources.
[INFO] skip non existing resourceDirectory  local/redhat_git/apiman-quickstarts/echo-service/src/main/resources
[INFO]
[INFO] --- maven-compiler-plugin:3.2:compile (default-compile) @ apiman-quickstarts-echo-service ---
[INFO] Changes detected - recompiling the module!
[INFO] Compiling 2 source files to  local/redhat_git/apiman-quickstarts/echo-service/target/classes
[INFO]
[INFO] --- maven-resources-plugin:2.7:testResources (default-testResources) @ apiman-quickstarts-echo-service ---
[INFO] Using 'UTF-8' encoding to copy filtered resources.
[INFO] skip non existing resourceDirectory  local/redhat_git/apiman-quickstarts/echo-service/src/test/resources
[INFO]
[INFO] --- maven-compiler-plugin:3.2:testCompile (default-testCompile) @ apiman-quickstarts-echo-service ---
[INFO] No sources to compile
[INFO]
[INFO] --- maven-surefire-plugin:2.12.4:test (default-test) @ apiman-quickstarts-echo-service ---
[INFO] No tests to run.
[INFO]
[INFO] --- maven-war-plugin:2.5:war (default-war) @ apiman-quickstarts-echo-service ---
[INFO] Packaging webapp
[INFO] Assembling webapp [apiman-quickstarts-echo-service] in [ local/redhat_git/apiman-quickstarts/echo-service/target/apiman-quickstarts-echo-service-1.2.4-SNAPSHOT]
[INFO] Processing war project
[INFO] Copying webapp resources [ local/redhat_git/apiman-quickstarts/echo-service/src/main/webapp]
[INFO] Webapp assembled in [37 msecs]
[INFO] Building war:  local/redhat_git/apiman-quickstarts/echo-service/target/apiman-quickstarts-echo-service-1.2.4-SNAPSHOT.war
[INFO]
[INFO] --- maven-source-plugin:2.4:jar-no-fork (attach-sources) @ apiman-quickstarts-echo-service ---
[INFO] Building jar:  local/redhat_git/apiman-quickstarts/echo-service/target/apiman-quickstarts-echo-service-1.2.4-SNAPSHOT-sources.jar
[INFO]
[INFO] --- maven-javadoc-plugin:2.10.1:jar (attach-javadocs) @ apiman-quickstarts-echo-service ---
[INFO]
Loading source files for package io.apiman.quickstarts.echo...
[INFO] Building jar:  local/redhat_git/apiman-quickstarts/echo-service/target/apiman-quickstarts-echo-service-1.2.4-SNAPSHOT-javadoc.jar
[INFO] ------------------------------------------------------------------------
[INFO] BUILD SUCCESS
[INFO] ------------------------------------------------------------------------
[INFO] Total time: 3.061 s
[INFO] Finished at: 2016-04-16T22:13:10-04:00
[INFO] Final Memory: 26M/307M
[INFO] ------------------------------------------------------------------------
If you look closely, near the end of the output, you’ll see the location of the .war file:
local/redhat_git/apiman-quickstarts/echo-service/target/apiman-quickstarts-echo-service-1.2.4-SNAPSHOT.warTo deploy the API, we can copy the .war file to our WildFly server’s deployments directory. After you copy the API’s .war file to the deployments directory, you’ll see output like this generated by the WildFly server:
22:33:59,794 INFO  [org.jboss.as.repository] (DeploymentScanner-threads - 1) WFLYDR0001: Content added at location local/redhat_git/apiman/tools/server-all/target/wildfly-{wildfly-version}/standalone/data/content/31/f9a163bd92c51daf54f70d09bff518c2aeef7e/content
22:33:59,797 INFO  [org.jboss.as.server.deployment] (MSC service thread 1-6) WFLYSRV0027: Starting deployment of "apiman-quickstarts-echo-service-1.2.4-SNAPSHOT.war" (runtime-name: "apiman-quickstarts-echo-service-1.2.4-SNAPSHOT.war")
22:33:59,907 INFO  [org.wildfly.extension.undertow] (ServerService Thread Pool -- 76) WFLYUT0021: Registered web context: /apiman-echo
22:33:59,960 INFO  [org.jboss.as.server] (DeploymentScanner-threads - 1) WFLYSRV0010: Deployed "apiman-quickstarts-echo-service-1.2.4-SNAPSHOT.war" (runtime-name : "apiman-quickstarts-echo-service-1.2.4-SNAPSHOT.war")
Make special note of this line of output:
22:33:59,907 INFO [org.wildfly.extension.undertow] (ServerService Thread Pool -- 76) WFLYUT0021: Registered web context: /apiman-echoThis output indicates that the URL of the deployed example API is:
Remember, however, that this is the URL of the deployed example API if we access it directly. We’ll refer to this as the "unmanaged API" as we are able to connect to the API directly, without going through the API Gateway. The URL to access the API through the API Gateway ("the managed API") at runtime will be different.
Now that our example API is installed, it’s time to install and configure our client to access the server.
Accessing the Example API Through a Client
There are a lot of options available when it comes to what we can use for a client to access our API. We’ll keep the client simple so that we can keep our focus on apiman and simply use a browser as the client. If you enter the API’s URL into a browser, an HTTP GET command will be executed. The response will look like this:
{
  "method" : "GET",
  "resource" : "/apiman-echo",
  "uri" : "/apiman-echo",
  "headers" : {
    "Cookie" : "s_fid=722D028B20E49214-13EAE1456E752098; __utma=111872281.807845787.1452188093.1460777731.1460777731.4; __utmz=111872281.1452188093.1.1.utmcsr=(direct)|utmccn=(direct)|utmcmd=(none); _ga=GA1.1.807845787.1452188093; __qca=P0-404983419-1452188093717; __utmc=111872281",
    "Accept" : "text/html,application/xhtml+xml,application/xml;q=0.9,*/*;q=0.8",
    "Connection" : "keep-alive",
    "User-Agent" : "Mozilla/5.0 (X11; Linux x86_64; rv:38.0) Gecko/20100101 Firefox/38.0",
    "Host" : "localhost:8080",
    "Accept-Language" : "en-US,en;q=0.5",
    "Accept-Encoding" : "gzip, deflate",
    "DNT" : "1"
  },
  "bodyLength" : null,
  "bodySha1" : null
}
Now that our example API is built, deployed and running, it’s time to create the organizations for the API provider and the API consumer. The differences between the requirements of the two organizations will be evident in their Apiman configuration properties.
OK, the preliminaries are over! Now, it’s time to go into the Apiman Management UI and create the Apiman data elements for our demonstration.
Creating Users for the API Provider and Consumer Organizations
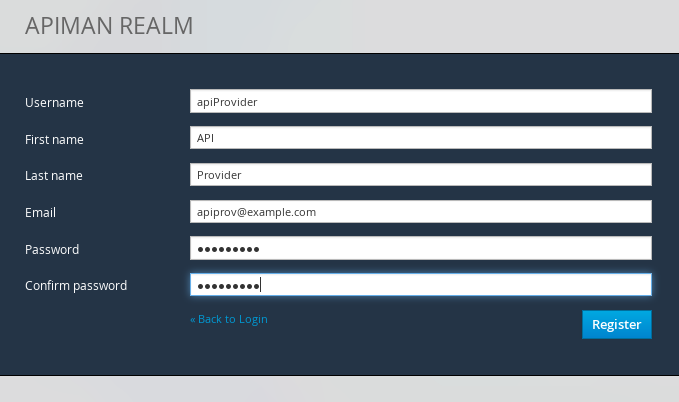
Before we create the organizations, we have to create a user for each organization. We’ll start by creating the API provider user. To do this, logout from the admin account in the API Manager UI. The login dialog will then be displayed.
Select the "New user/Register" Option and register the API provider user:
Then, logout and repeat the process to register a new application developer user too:

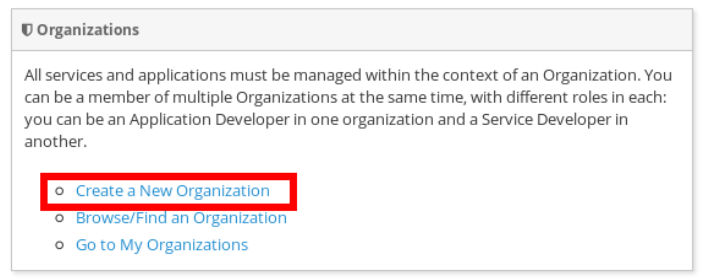
Now that the new users are registered we can create the organizations.
Creating the API Provider Organization
To create the API provider organization, log back into the API Manager UI as the apiprov user and select “Create a new Organization”:
Select a name and description for the organization, and press “Create Organization”:
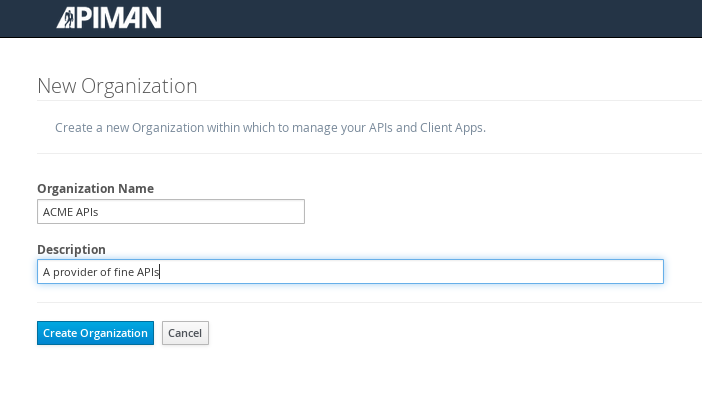
And, here’s our organization:
Note that in a production environment, users would request membership in an organization. The approval process for accepting new members into an organization would follow the organization’s workflow, but this would be handled outside of the API Manager API. For the purposes of our demonstration, we’ll keep things simple.
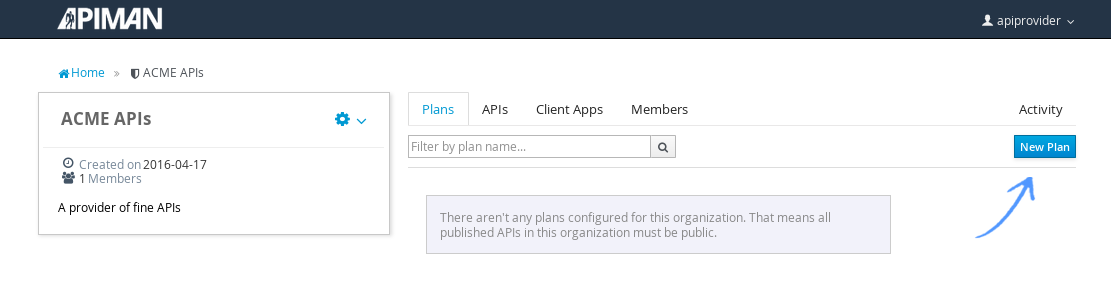
Configuring the API, its Policies, and Plans
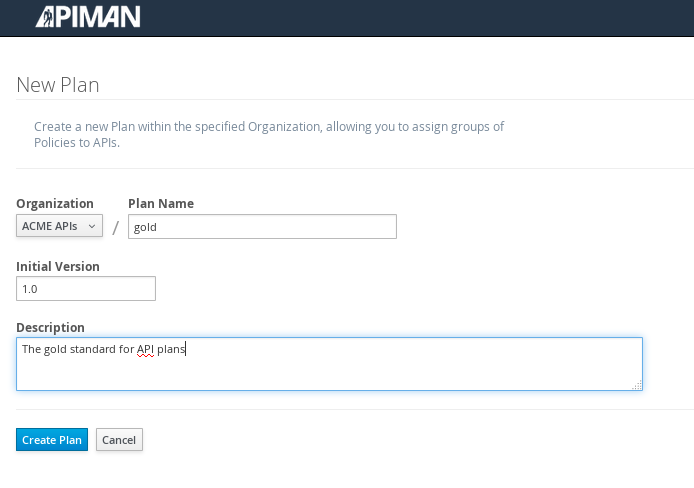
To configure the API, we’ll first create a plan to contain the policies that we want applied by the API Gateway at runtime when requests to the API are made. To create a new plan, select the “Plans” tab. We’ll create a “gold” plan:
Once the plan is created, we will add policies to it:
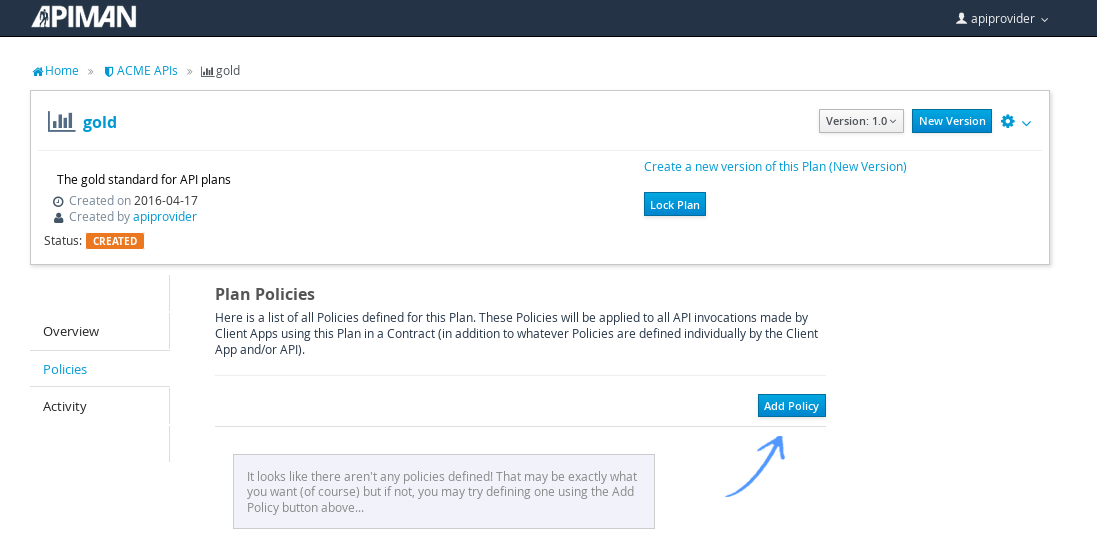
Apiman provides several OOTB policies/plans. Since we want to be able to demonstrate a policy being applied, we’ll select a Rate Limiting Policy, and set its limit to a very low level. If our API receives more than 10 requests in a day/month, the policy should block all subsequent requests. So much for a “gold” level of API!

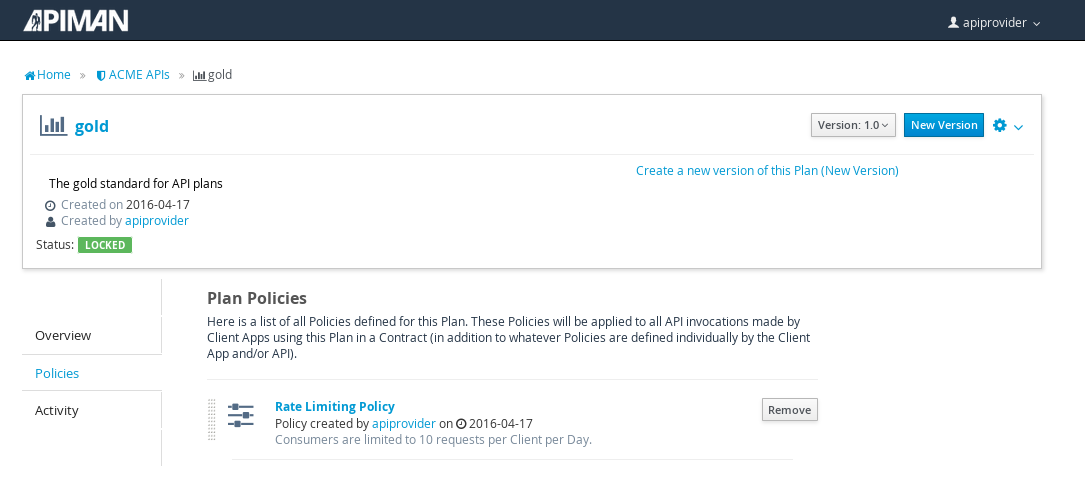
After we create the policy and add it to the plan, we have to lock the plan:
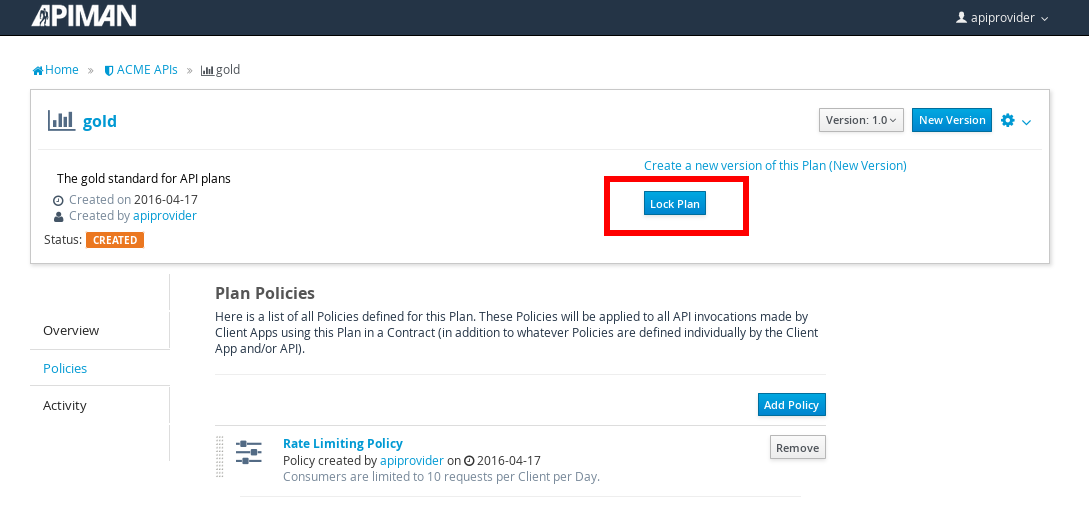
And, here is the finished, and locked plan:
At this point, additional plans can be defined for the API. We’ll also create a “silver” plan, that will offer a lower level of API (i.e., a request rate limit lower than 10 per day/month) than the gold plan. Since the process to create this silver plan is identical to that of the gold plan, we’ll skip the screenshots.
Now that the two plans are complete and locked, it’s time to define the API.
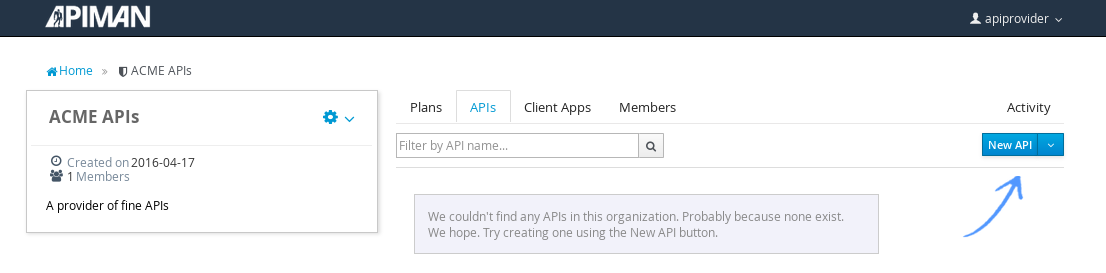
We’ll give the API an appropriate name, so that providers and consumers alike will be able to run a query in the API Manager to find it.
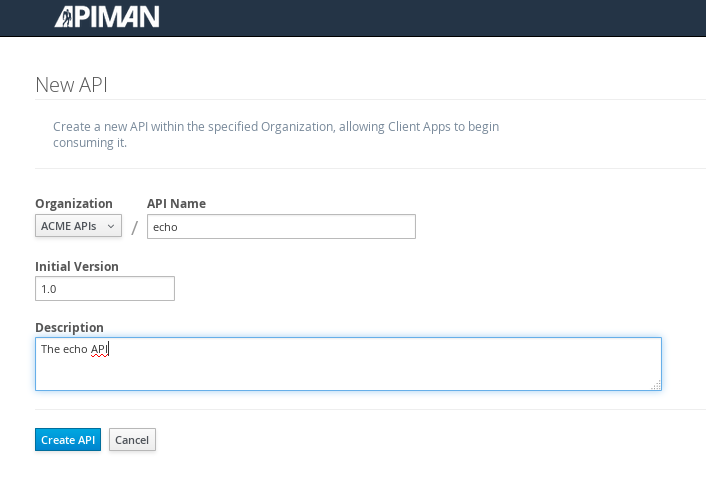
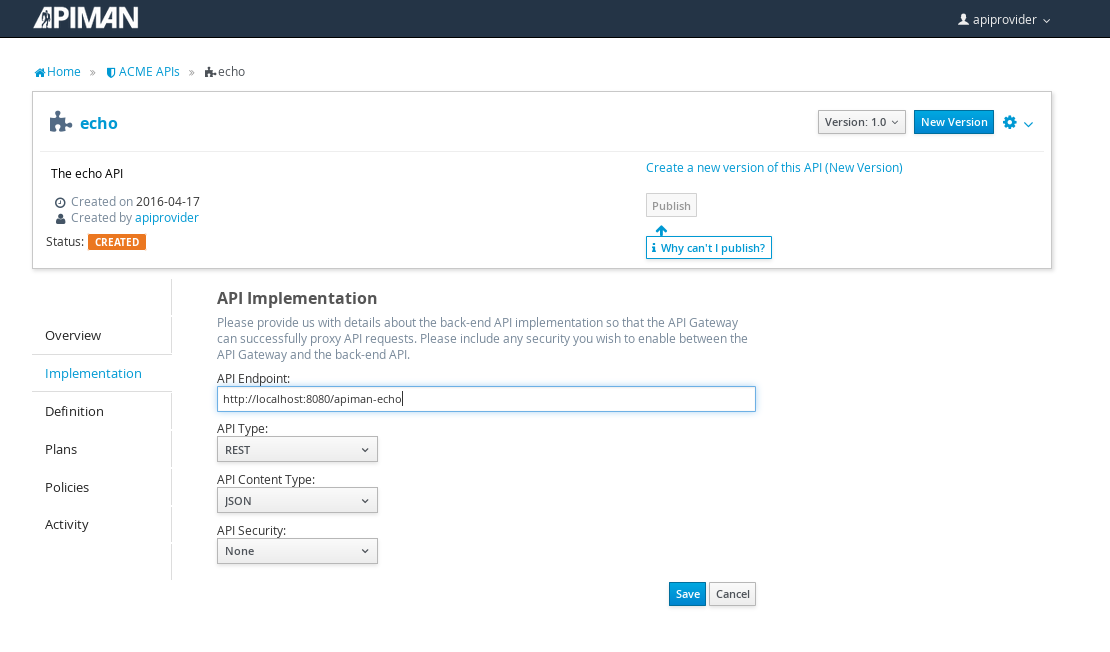
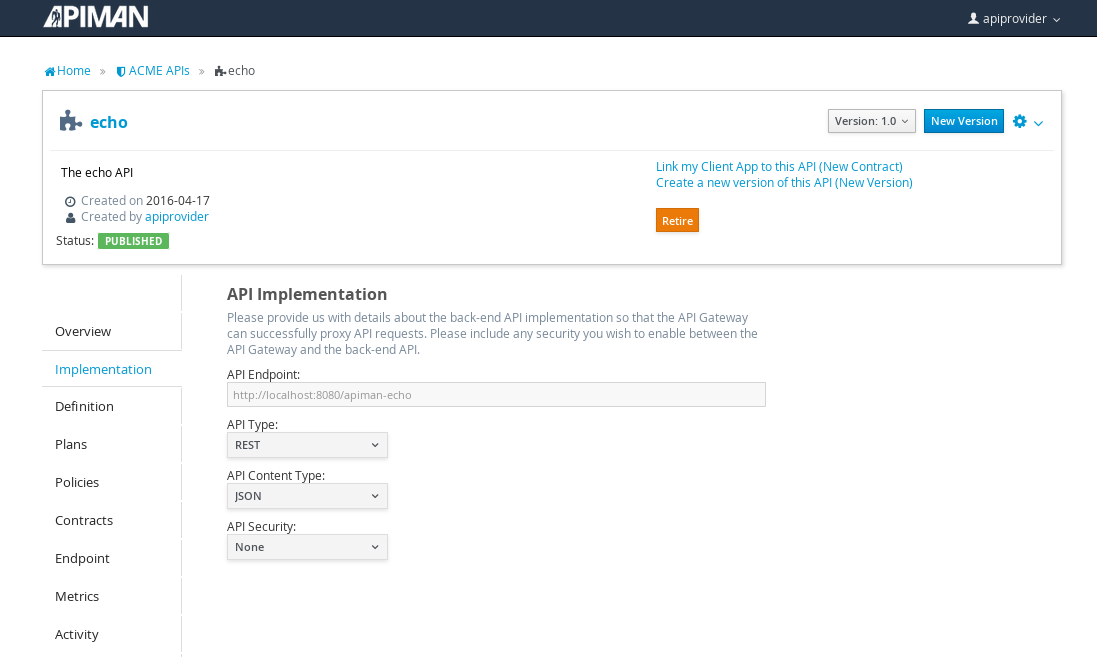
After the API is defined, we have to define its implementation. In the context of the API Manager, the API Endpoint is the API’s direct URL. Remember that the API Gateway will act as a proxy for the API, so it must know the API’s actual URL. In the case of our example API, the URL is: localhost:8080/apiman-echo
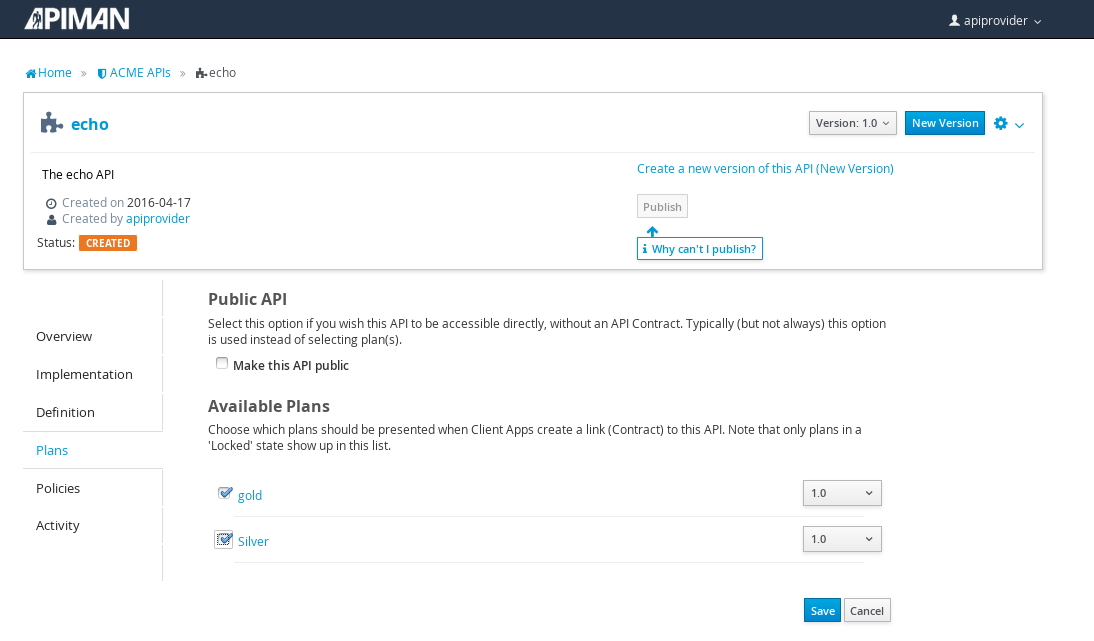
The plans tab shows which plans are available to be applied to the API:
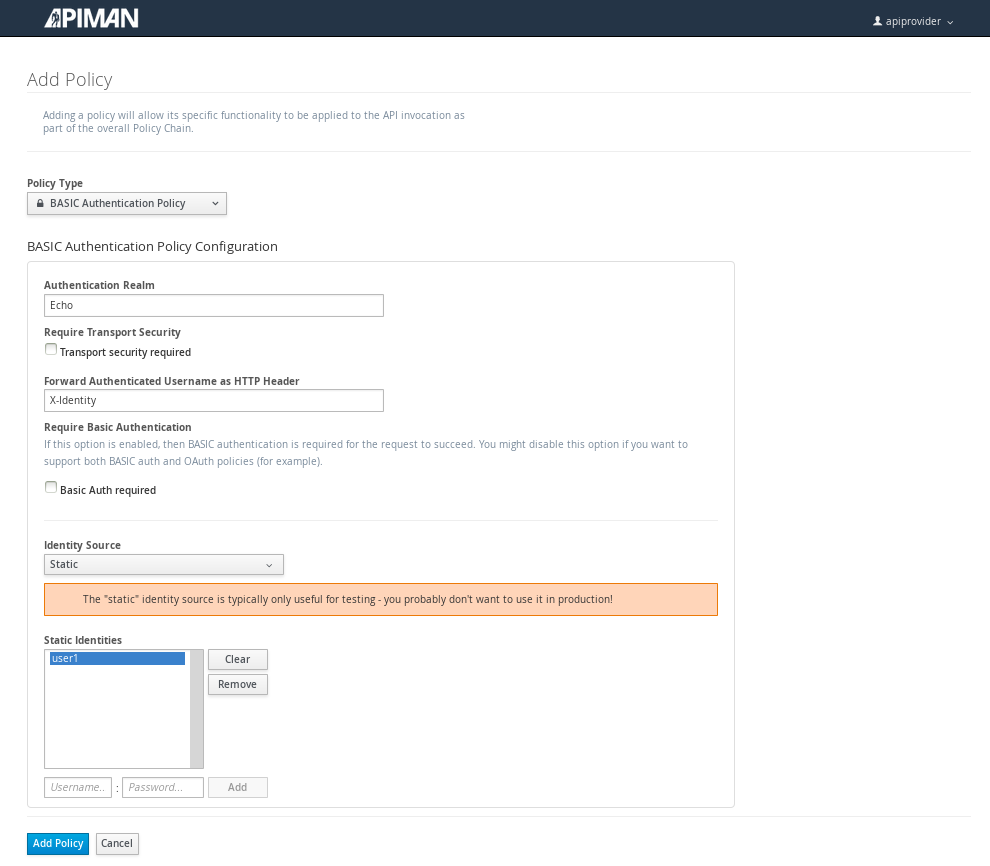
Let’s make our API more secure by adding an authentication policy that will require users to login before they can access the API. Select the Policies tab, and then define a simple authentication policy. Remember the user name and password that you define here as we’ll need them later on when send requests to the API.
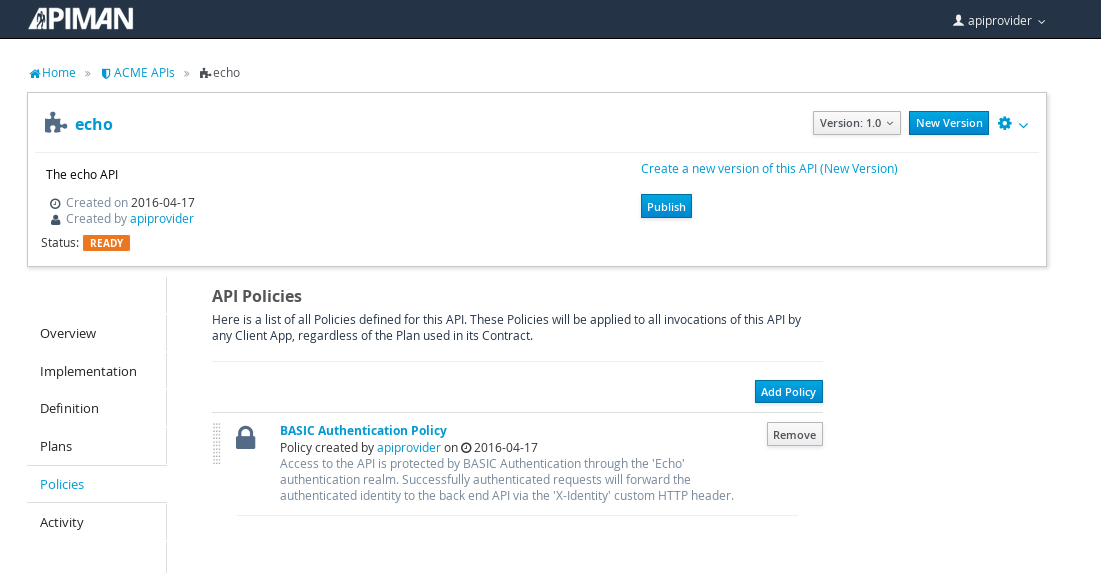
After the authentication policy is added, we can publish the API to the API Gateway:
And, here it is, the published API:
OK, that finishes the definition of the API provider organization and the publication of the API.
Next, we’ll switch over to the API consumer side and create the API consumer organization and register an application to connect to the managed API through the proxy of the API Gateway.
The API Consumer Organization
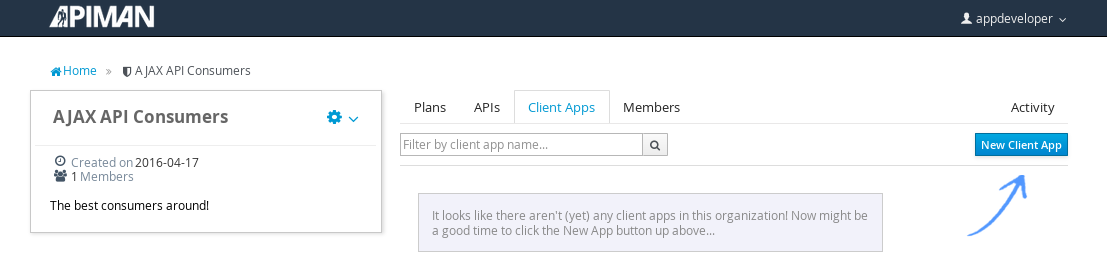
We’ll repeat the process that we used to create the application development organization. Log in to the API Manager UI as the “appdev” user and create the organization:

Unlike the process we used when we created the elements used by the API provider, the first step that we’ll take is to create a new application and then search for the API to be used by the application:
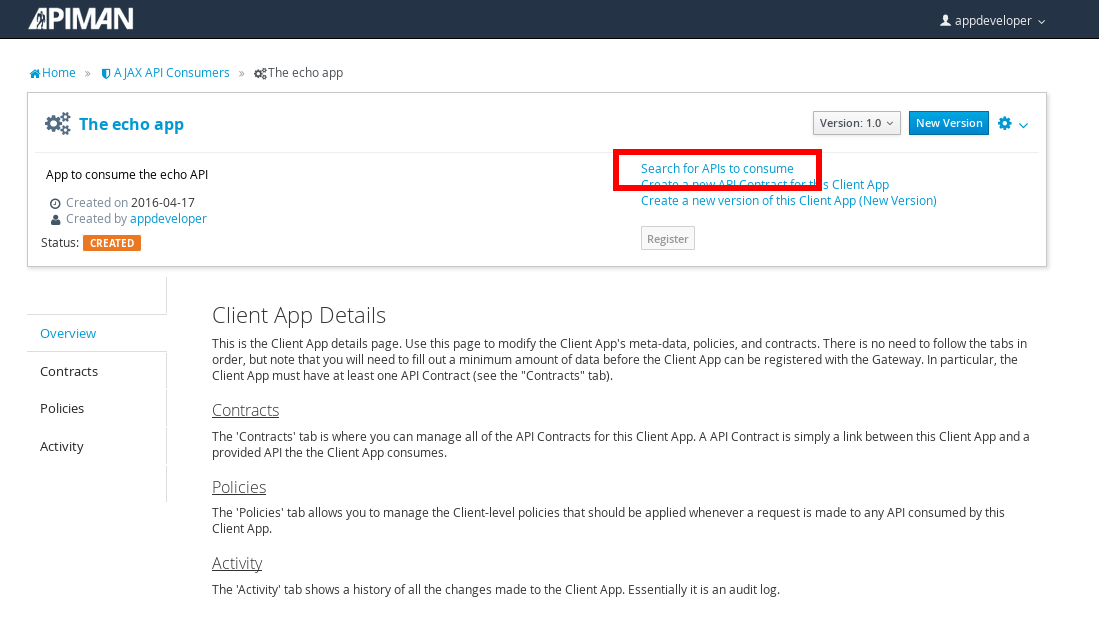
Searching for the API is easy, as we were careful to set the API name to something memorable:

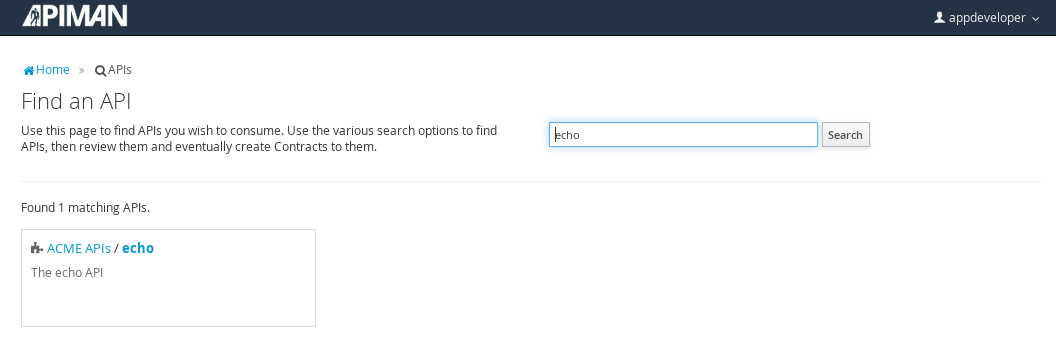
Select the API name, and then specify the plan to be used. We’ll splurge and use the gold plan:
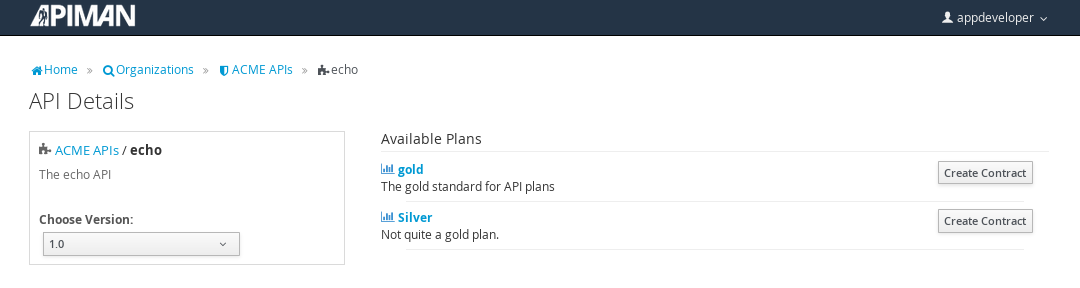
Next, select “create contract” for the plan (for this example, we’ll just accept all the defaults):

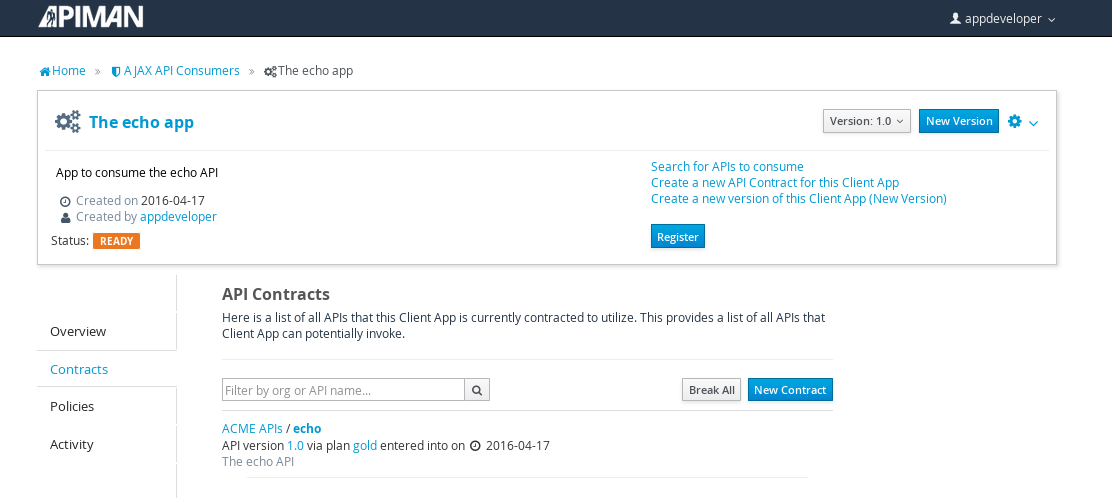
The last step is to register the application with the API Gateway so that the gateway can act as a proxy for the API:
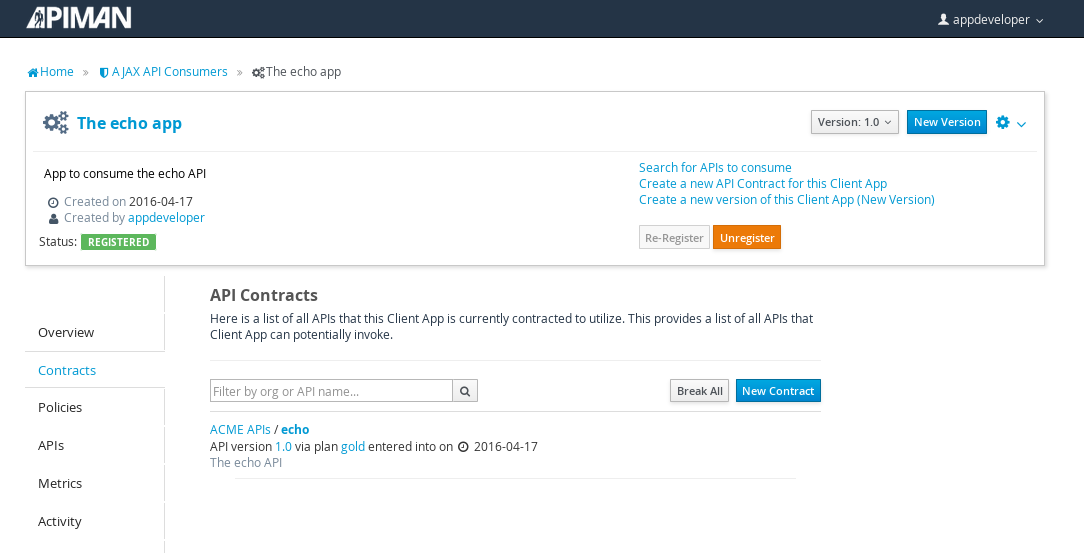
Congratulations! All the steps necessary to both provide and consume the configure the API are complete!
There’s just one more step that we have to take in order for clients to be able access the API through the API Gateway.
Remember the URL that we used to access the unmanaged API directly? Well, forget it. In order to access the managed API through the API Gateway acting as a proxy for other API we have to obtain the managed API’s URL. In the API Manager UI, header over to the “APIs” tab for the application, select the API and then click select on the “i” character to the right of the API name. This will expose the API Key and the API’s HTTP endpoint in the API Gateway:
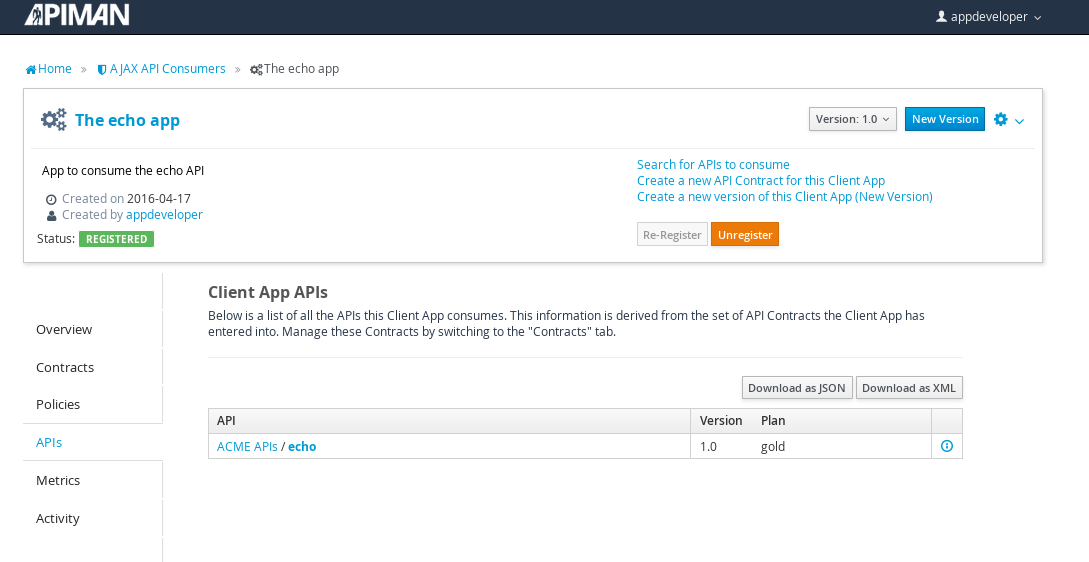
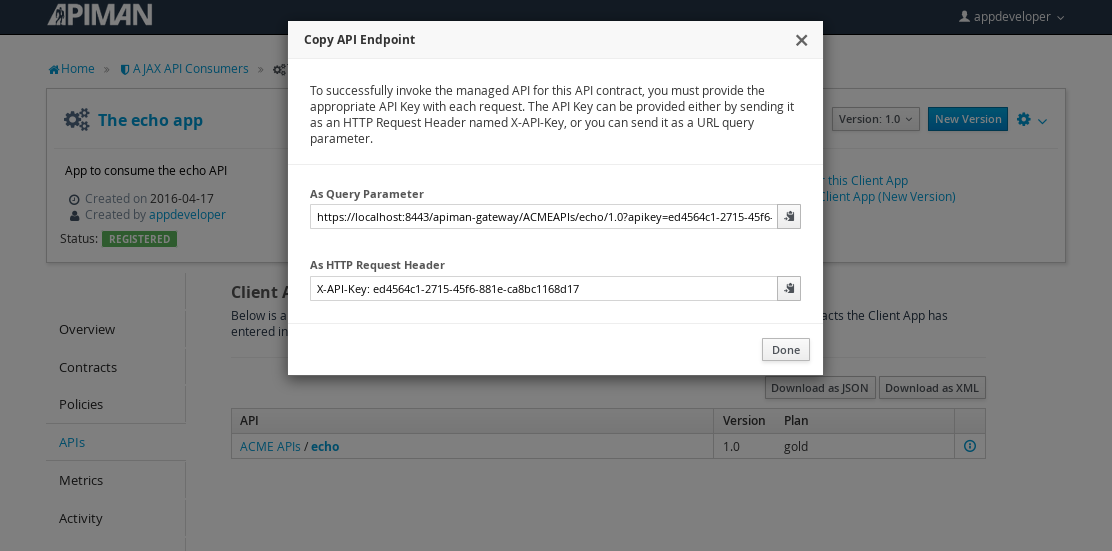
In order to be able to access the API through the API Gateway, we have to provide the API Key with each request. combine the API Key and HTTP endpoint. The API Key can be provided either through an HTTP Header (X-API-Key) or a URL query parameter.
In our example, the API request looks like this:
https://localhost:8443/apiman-gateway/ACMEAPIs/echo/1.0?apikey=ed4564c1-2715-45f6-881e-ca8bc1168d17Copy the URL into the clipboard.
Accessing the Managed API Through the Apiman API Gateway, Watching the Policies at Runtime
Thanks for hanging in there! The set up is done. Now, we can fire up the client and watch the policies in action as they are applied at runtime by the API Gateway.
Open a new browser window or tab, and enter the URL for the managed API.
What happens first is that the authentication policy is applied and a login dialog is then displayed:
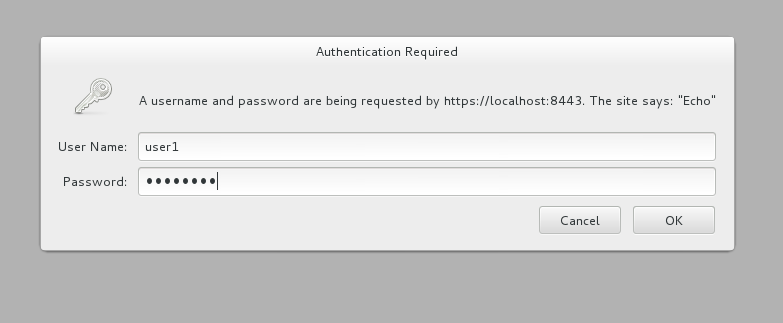
Enter the username and password (user1/password) that we defined when we created the authentication policy to access the API. The fact that you are seeing this dialog confirms that you are accessing the managed API and are not accessing the API directly.
When you send a GET request to the API, you should see a successful response:
{
 "method" : "GET",
 "resource" : "/apiman-echo",
 "uri" : "/apiman-echo",
 "headers" : {
	"Cookie" : "s_fid=722D028B20E49214-13EAE1456E752098; __utma=111872281.807845787.1452188093.1460777731.1460777731.4; __utmz=111872281.1452188093.1.1.utmcsr=(direct)|utmccn=(direct)|utmcmd=(none); _ga=GA1.1.807845787.1452188093; __qca=P0-404983419-1452188093717; __utmc=111872281",
	"Accept" : "text/html,application/xhtml+xml,application/xml;q=0.9,*/*;q=0.8",
	"User-Agent" : "Mozilla/5.0 (X11; Linux x86_64; rv:38.0) Gecko/20100101 Firefox/38.0",
	"Connection" : "keep-alive",
	"X-Identity" : "user1",
	"Host" : "localhost:8080",
	"Accept-Language" : "en-US,en;q=0.5",
	"Accept-Encoding" : "gzip, deflate",
	"DNT" : "1"
 },
 "bodyLength" : null,
 "bodySha1" : null
}
So far so good. Now, send 10 more requests and you will see a response that looks like this as the gold plan rate limit is exceeded:
{
   "type" : "Other",
   "headers" : {
      "empty" : false,
      "entries" : [
         {
            "X-RateLimit-Remaining" : "-1"
         },
         {
            "X-RateLimit-Reset" : "50904"
         },
         {
            "X-RateLimit-Limit" : "10"
         }
      ]
   },
   "failureCode" : 10005,
   "message" : "Rate limit exceeded.",
   "responseCode" : 429
}
And there it is. Your gold plan has been exceeded. Maybe next time you’ll spend a little more and get the platinum plan 😅!
Let’s recap what we just accomplished in this demo:
-
We installed Apiman onto a WildFly server instance.
-
We used git to download and maven to build a sample REST client.
-
As an API provider, we created an organization, defined policies based on API use limit rates and user authentication, and a plan, and assigned them to an API.
-
As an API consumer, we searched for and found that API, and assigned it to an application.
-
As a client, we accessed the API and observed how the API Gateway managed the API.
And, if you note, in the process of doing all this, the only code that we had to write or build was for the client. We were able to fully configure the API, policies, plans, and the application in the API Manager UI.