
For those of you who might be interested in hacking away at some core apiman code, I thought it might be nice to create a reasonably comprehensive step-by-step guide. For the most part everything is straightforward, but there are a copule of tricks you can use to get up and running fast and to be able to easily iterate on any changes you make.
Read on if this sounds like something you want to do!
What will this post cover?
Here is a high level overview of the steps we’ll take to getting a working apiman development environment. First, here are my basic assumptions:
-
You are a java developer and have JDK7 or higher installed
-
You are familiar with maven and have it installed
-
You know git and have it installed
-
You want to use the Eclipse IDE
Assuming you meet all of the above requirements, you should have no trouble with this guide! Here is what this post will cover:
-
Getting the apiman source code
-
Downloading and running Eclipse
-
Configuring Eclipse for apiman development
-
Importing the apiman source code into Eclipse
-
Running Development versions of the apiman components
Getting the apiman source code
The first thing you (obviously) need to do is download the apiman project source code. All the code is in GitHub, of course. You can find the code here:
The 'apiman' GitHub organization has a couple of additional repositories as well. For example the quickstarts and plugins each have their own repos. But let’s stick with the core code for this post.
If you want to follow best practice, you should "fork" the apiman repository on GitHub, then clone your forked copy. Once you have used the GitHub UI to fork the repository, you would do something like this:
git clone git@github.com:<YOUR-GITHUB-ID>/apiman.gitI also recommend adding the upstream GitHub repository as another remote so that you can easily pull in upstream changes:
git remote add upstream git@github.com:apiman/apiman.gitDownloading and running Eclipse
Alright - you’ve got the apiman code cloned on your local hard drive somewhere. The next step is to download Eclipse (if you don’t already have it installed). This can be done here:
I like to download the "Eclipse IDE for Java EE Developers" version because it comes with a lot of extra stuff I like to use. But you should be fine with the basic version as well. I’m going to use the EE version as I write this guide!
Once you’ve completed the download, just unpack it and run Eclipse.

Configuring Eclipse for apiman development
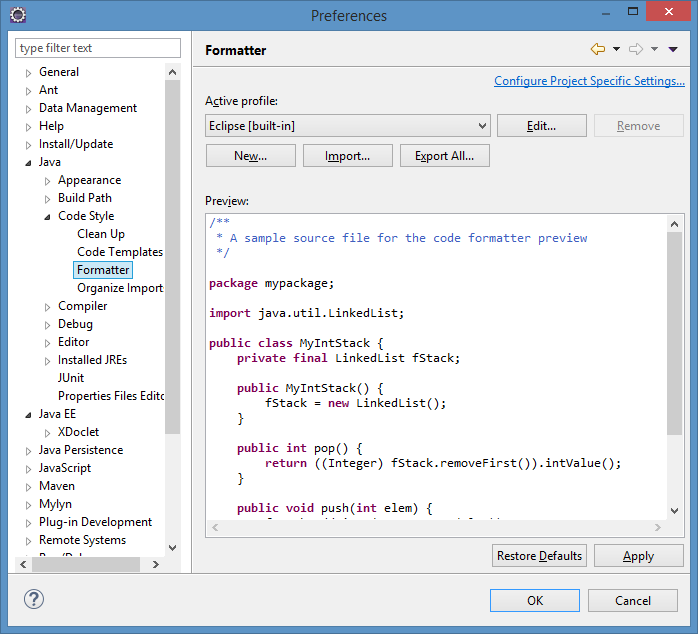
Great! You’ve got Eclipse running. Now let’s make a minor change to it specific to apiman development. Go ahead and import the apiman code formatter specification. You can find this file in the apiman code repository here:
apiman/tools/src/eclipse/apiman-eclipse-formatter.xmlImport that file in the Eclipse Preferences dialog here:
Importing the apiman source code into Eclipse
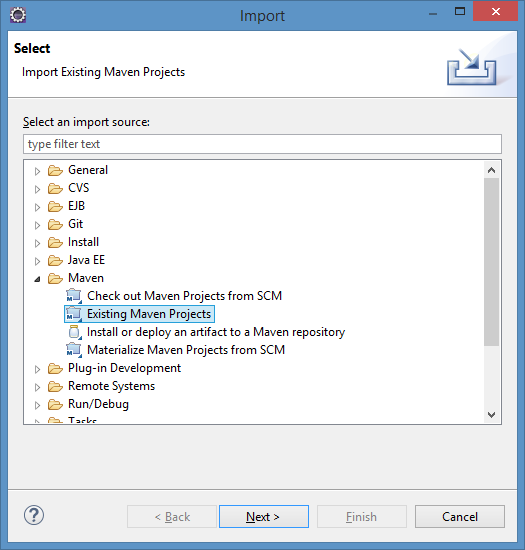
OK now we’re ready to import the apiman source code into Eclipse. Because apiman uses maven as its build system, and because Eclipse has maven support built-in via m2e, this should be a snap. Simply go to File->Import and choose Maven/Existing Maven Projects:
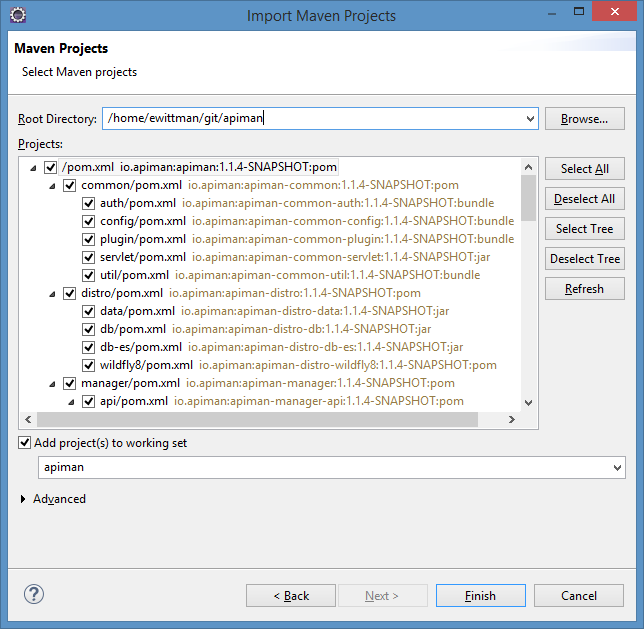
Importing the projects into Eclipse may take some time, and Eclipse may yell at you about unresolved m2e plugins and whatnot. Make sensible choices (e.g. resolve later) and go about your life. Go get a cup of coffee, the build will probably take a few minutes.
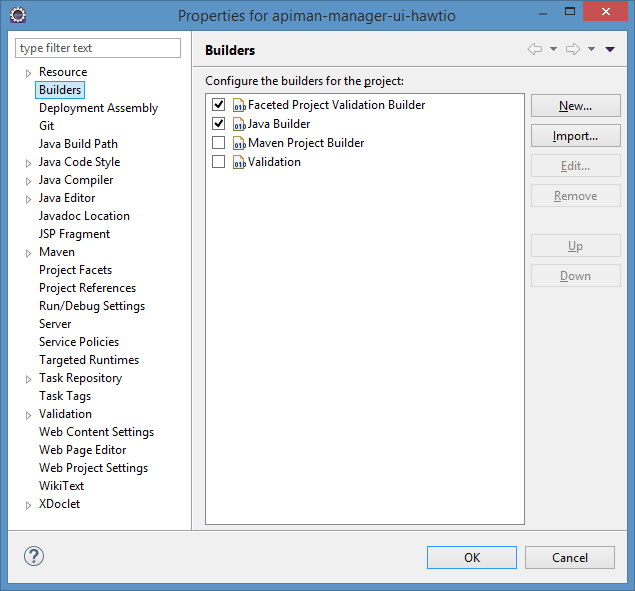
It is possible you will run into a problem where the apiman-manager-ui-hawtio project gets into a build loop. This can be corrected by disabling the maven builder for that one project only. Do this by right-click on that project and choosing properties:
Typically, this will leave you with a bunch of annoying warnings in Eclipse, most of which will be HTML Problems. I will leave it as an exercise to the reader about how to disable those.
| you should have 0 Java errors at this point! |
Running Development versions of the apiman components
Everything should now be loaded into Eclipse. Now all you need is a quick way to run everything. Of course, you can always do a full rebuild via maven and use the "install-all-wildfly8" profile:
cd ~/git/apiman
mvn clean install -Pinstall-all-wildfly8
That will result in a full apiman environment installed in WildFly 8. If you use this approach you can run apiman here:
cd ~/git/apiman/tools/server-all/target/wildfly-8.2.0.Final
./bin/standalone.sh --debug
Then you can connect a remote debugger to WildFly and debug apiman from Eclipse.
But a quicker way to run the various apiman components exists.
As you may or may not know, apiman consists of two components:
-
The API Manager (RESTful APIs + UI)
-
The API Gateway
You can run/test these pieces together or separately. Let’s first explore the API Manager.
Launching a Dev version of the API Manager REST APIs
This is actually really easy:
-
Open up the java class
ManagerApiDevServer -
Debug As → Java Application
Easy as that! It should fire up an instance of Jetty with the apiman API Manager backend (RESTful APIs) deployed. You can test this by going here:
http://localhost:7070/apiman/system/statusLog in using username admin and password admin. Oh by the way, did I mention that it runs on port 7070? That’s important!
Using gulp to make UI changes
We use angularjs and typescript as the basis for the UI. In order to develop UI code you’ll need to use gulp. We have documented how to do this here:
https://github.com/apiman/apiman/blob/master/manager/ui/hawtio/README.mdGive that a quick read! When it asks you to configure your new copy of the config.js file, it should look like this:
var APIMAN_CONFIG_DATA = {
  "apiman" : {
    "version" : "1.2.0-SNAPSHOT",
    "builtOn" : "2015-01-01",
    "logoutUrl" : "logout"
  },
  "user" : {
    "username" : "admin"
  },
  "ui" : {
    "header" : "apiman",
    "metrics" : true
  },
  "api" : {
    "endpoint" : "http://localhost:8080/apiman",
    "auth" : {
      "type" : "basic",
      "basic" : {
        "username" : "admin",
        "password" : "admin123!"
      }
    }
  }
};
If you get it all set up properly you should be able to point your browser here:
http://localhost:2772/api-manager/dashNow whenever you make changes to any of the apiman angularjs code, the browser will automatically refresh and show you the changes!