Crash Course in Apiman 1.5.7.Final
A Crash Course in API Management with Apiman
Introduction
Welcome to the crash course in JBoss Apiman! The goal of this crash course is to provide a short and easy to consume introduction to API Management with Apiman. This crash course will explain how Apiman works and will walk you through a hands-on session to demonstrate how to use it. This crash course also provides links to the extensive on-line Apiman user documentation, demos and quickstarts, and other resources.
This crash course is organized into the following sections:
-
How Apiman Works - This section describes the data model Apiman uses, and how it uses the elements created in that data model to perform its tasks.
-
Policies: At the Core of API Management - In API Management, policies are where the action is. It’s the policies that define the rules that Apiman uses to manage your APIs. Since policies are so important, this is the longest section of the crash course.
Each of the next four sections in the crash course describes how Apiman supports the four primary groups of Apiman users:
-
Providing APIs - This section describes how API providers can use Apiman to publish APIs and summarizes management options for those APIs.
-
Consuming APIs - And this section describes how their counterparts, consumers of APIs, utilize Apiman.
-
Managing Apiman - This section describes the major tasks that are performed by Apiman administrators.
-
Developing for Apiman - And, this section describes how Apiman supports the development of extensions and customizations.
Each of the last two sections in the crash course provides step-by-step descriptions of how to use Apiman to:
-
Install, configure and get Apiman running for API providers and API consumers in 10 minutes.
-
Utilize Apiman’s REST interface to automate tasks.
Let’s get started!
Section 1 - How Apiman Works
The (4) primary groups of Apiman users are:
-
API Providers
-
API Consumers
-
API Management Administrators
-
API Developers
Apiman fulfills these groups of users' needs by providing these subsystems:
-
API Manager - The API Manager provides an easy way for API providers to use a web UI to define plans for their APIs, apply these plans across multiple APIs, and control role-based user access and API versioning. These plans can govern access to APIs and limits on the rate at which consumers can access APIs. The same UI enables API consumers to easily locate and access APIs. All features available in the web UI are also available via a REST interface, allowing full automation.
-
API Gateway - The gateway applies the policies configured in the API Manager, enforcing them as runtime rules for each managed API request made. The way that the API Gateway works is that the consumer of the API accesses the API through a URL that designates the API Gateway as a proxy for the API. If the policies defined to govern access to the API permit that access, the API Gateway then proxies requests to the backend API implementation.
-
An Extensible Plugin-Based Architecture - API Developers can create their own custom API management policies and install them into Apiman. In addition, custom implementations of core Apiman components can be created and used, without needing to rebuild the core system.
The Apiman Data Model
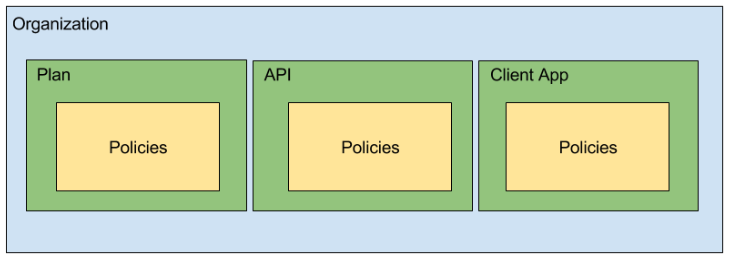
Apiman uses a hierarchical data model that consists of the following primary elements:
-
Organizations
-
Plans
-
APIs
-
Client Apps
-
Policies
-
Policies - Policies are at the lowest level of the data model, but they are arguably the most important concept because they represent the unit of work done at runtime (when the API Gateway applies the policies to all API requests). Everything defined in the API Manager is there to enable Apiman to apply policies to requests made to APIs. When a request to an API is made, Apiman creates a chain of policies to be applied to that request. Apiman policy chains define a specific sequence order in which the policies defined in the API Manager UI are applied to API requests. You can think of a policy as a rule, or set of rules that are enforced by the API Gateway. There are multiple types of Apiman policies. Some policies allow or block access to APIs based on the IP address of the client application, while others allow or restrict access to specific resources provided by an API, while still others enable you to control or “throttle” the rate at which requests made to an API.
-
Plans - In Apiman, a Plan is a set policies that together define the level of service that Apiman provides for an API. Plans enable Apiman users to define multiple different levels of service for their APIs. It’s common to define different plans for the same API, where the differences depend on configuration options. For example, an organization may offer both a “gold” and “silver” plan for the same API. The gold plan may be more expensive than the silver plan, but it may offer a higher level of API requests in a given (and configurable) time period.
-
APIs - These represent real back-end APIs that are being “managed” by Apiman. An API can either be Public (available to any invoker at a static endpoint) or Private (only invokable by Client Apps that are modeled within Apiman). This is the primary entity that an API Provider is responsible for editing within the API Manager.
-
Client Apps - A Client App represents a piece of software that needs to consume managed APIs that are offered through Apiman. Each Client App can consume multiple APIs within Apiman by creating a contract to the API through one of its Plans. This is the primary entity that an API Consumer is responsible for editing within the API Manager.
-
Organizations - The Organization is at the top level of the Apiman data model. An organization contains and manages all elements used by a company, university, group inside a company, etc. for API management with Apiman. All Plans, APIs,and Client Apps are defined in an Apiman organization. In this way, an organization acts as a container of other elements. Users must be associated with an organization before they can use Apiman to manage elements within it. Apiman implements role-based access controls for users. The organization membership role assigned to a user defines the actions that a user can perform and the elements that a user can manage within the organization.
|
In the Apiman data model, almost everything exists in the context of an organization. |
Note that the Apiman data model supports versioning for many of its data elements. Versioning enables you to retain and make use of multiple versions of data elements such as APIs and plans.
Apiman at Runtime - Proxying Requests
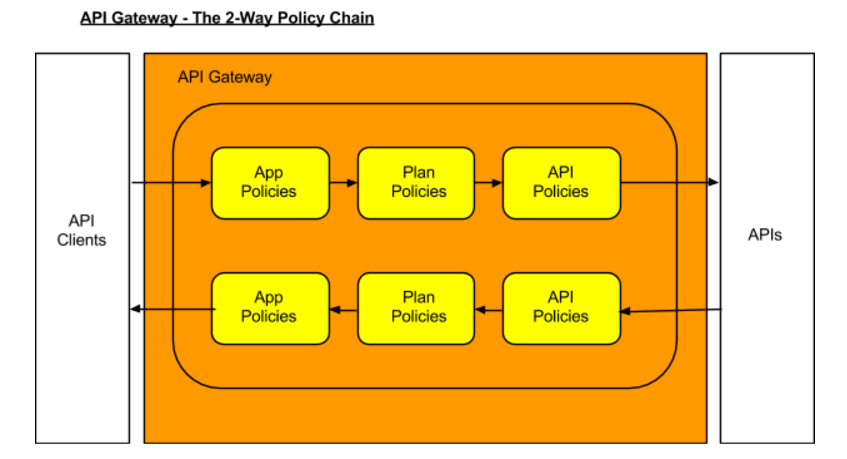
What happens is that when an API request is received by the API Gateway at runtime, the policy chain is applied in the order of client app, plan, and API. If no failures, such as a rate counter being exceeded, occur, the API Gateway sends the request to the API. In order to be accepted by the API Gateway, a request must include an API key. The API Gateway acts as a proxy for the API:
Next, when the API Gateway receives a response from the API’s backend implementation, the policy chain is applied again, but this time in the reverse order. The API policies are applied first, then the plan policies, and finally the client app policies. If no failures occur, then the API response is sent back to the consumer of the API.
Before we move on, it’s important that we’re clear on some basic terminology. When we talk about an API that is managed by Apiman (in other words, a managed API), we’re referring to an an API where the Apiman API Gateway is acting as a proxy. In order to able access a managed API, a client app must make of of an API key that is generated when the API is published to the API Gateway. The API key is embedded in the URL at which the managed API is published by the API Gateway. We’ll see a working example of this later in the crash course.
|
From a client app’s perspective, the only difference between accessing a managed API and another API is the format of the APIs' endpoint URL. |
The sequence in which incoming API requests have policies applied is:
-
First, at the client app level. In Apiman, a client app is contracted to use one or more APIs.
-
Second, at the plan level. In Apiman, policies can be organized into groups called plans.
-
Third, at the individual API level.
By applying the policy chain twice, both for the originating incoming request and the resulting response, Apiman allows policy implementations two opportunities to provide management functionality during the lifecycle. The following diagram illustrates this two-way approach to applying policies:
Section 2 - Policies, the Core of API Management
Policies are the most important element of API management. All the subsystems in Apiman, from the Management API UI to the API Gateway, exist for one ultimate goal; to ensure that API governance is achieved by the application of policies to API requests. In Apiman, policies are applied through a policy chain. Apiman is not only preconfigured with a rich set of policies that you can use, right out of the box, it also supports a mechanism that you can use to define your own custom policies.
|
API governance is achieved by the API Gateway applying policies to API requests. |
Apiman has support for many policies, including (but not limited to):
| Policy Categories | Policies |
|---|---|
Security Policies |
|
Limiting Policies |
|
Modification Policies |
|
Other Policies |
|
Let’s learn a little bit more about policies.
What’s in a Policy
An Apiman policy consists of the following:
-
Basic meta-data about the policy (name, description)
-
JSON based configuration
-
A Java class providing the implementation of the policy
Each policy supported by Apiman performs a specific task, such as (but not limited to):
-
Rate Limiting/Quotas
-
Security
-
Caching
-
Transformation
Every API managed by Apiman can be configured with zero or more policies. In addition, an API can be offered for consumption through several Plans, where each Plan can be configured with zero or more policies. Finally, a Client App can also be configured with a set of policies. Whenever the API Gateway receives a request for an API (optionally on behalf of a specific Client App), it creates a chain of policies from those configured at the three levels, and then applies that chain of policies to the request.
Most of the Apiman policies work alone (e.g. caching), but some of them are used in conjunction with other policies. The next couple of sections will discuss two very common categories of policies, some of the policies found in those categories, and how they work together.
Security Policies - Authentication & Authorization
We’ll start with the Authorization and Authentication policies. We’ll review these policies together as the use of the Authorization type depends on the BASIC authentication type. Before we take a detailed look at the policies supported by Apiman, it’s important that we understand the differences between authentication and authorization:
-
In authentication-based policies, access to an API is governed by the identity of the user
-
In authorization-based policies, access to an API, or specific resources provided by an API is governed by the role(s) assigned to a user
In order to make use of an authorization policy, roles must be extracted during authentication. In other words, you cannot have authorization without authentication.
APIs often define security requirements to ensure that clients have to authenticate. By having Apiman perform this authentication, backend APIs are freed from having to implement and perform this authentication. This also has the added benefit of centralizing the authentication for all your APIs.
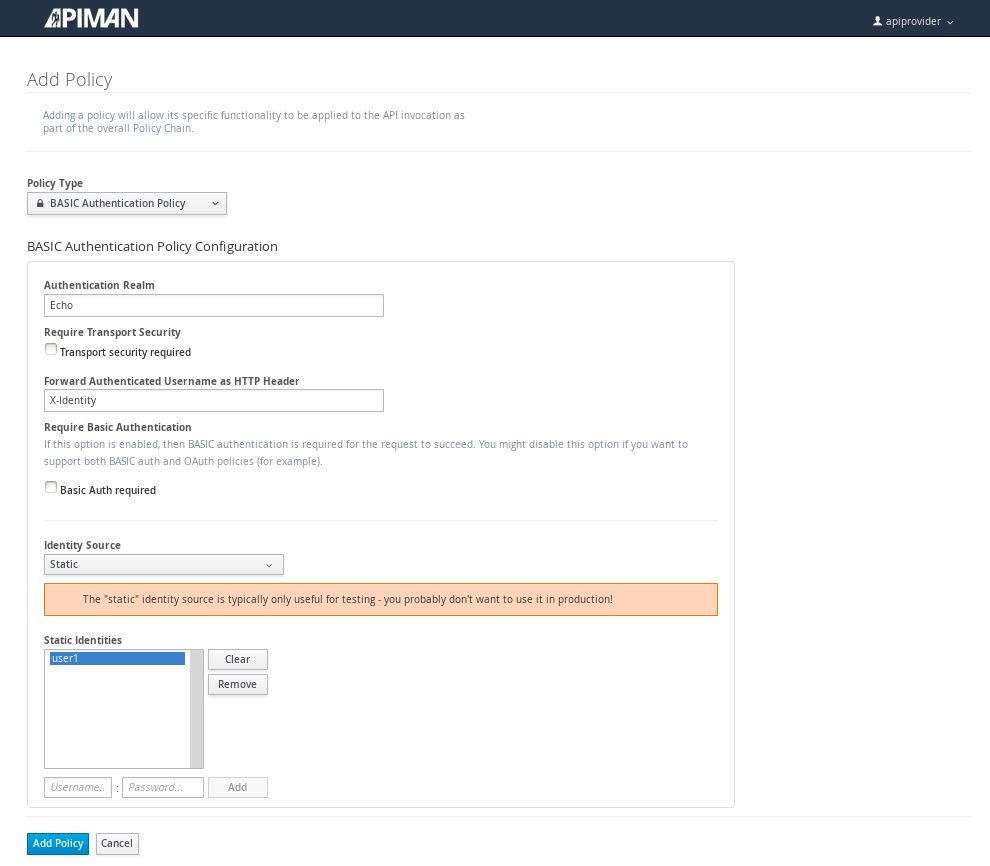
In creating an Authentication policy, we define an Authentication Realm (think of this as an area to be protected, within which usernames and passwords exist) and an optional HTTP header. The HTTP header is used to optionally pass the authenticated user’s principal to the back-end API through an HTTP header. This is useful if the back-end system needs to know the username of the user calling it (e.g. to perform a user-specific operation).
An Apiman Authorization policy consists of a set of rules. The rules define the resources that can be accessed in terms of a regular expression and an HTTP verb (GET, PUT, etc.)
Through its authorization policies, Apiman enables you to create fine-grained rules to govern access to your API’s resources. For example, based on the user roles that you define, users assigned a “sales” role can access the sales related API resources, and users assigned a “marketing” role can access the marketing related API resources. Users assigned to to an “admin” role are able to access all the API’s resources.
As we mentioned a moment ago, in order to make use of an authorization policy, roles must be extracted during authentication. Apiman can be configured to extract those roles from an available source; for instance, the JSON Web Token when using Keycloak, or JDBC/LDAP with the BASIC authentication policy in the API request. Remember, you cannot have authorization without authentication.
Limiting Policies - Rates and Quotas
Apiman provides (3) limiting policies:
-
Rate Limiting - This policy type governs the number of times requests are made to an API within a specified time period. The requests can be filtered by user, application, or API and can set the level of granularity for the time period to second, minute, hour, day, month, or year. The intended use of this policy type is for fine grained processing (e.g., 10 requests per second).
-
Quota - This policy type performs the same basic functionality as the Rate Limiting policy type., however, the intended use of this policy type is for less fine grained processing (e.g., 10,000 requests per month).
-
Transfer Quota - In contrast to the other policies, Transfer Quota tracks the number of bytes transferred (either uploaded or downloaded) rather than the total number of requests made.
Each of these policies, if used singly, can be effective in throttling requests. Apiman, however, adds an additional layer of flexibility to your use of these policies by enabling you to use them in combinations. Let’s look at a few examples.
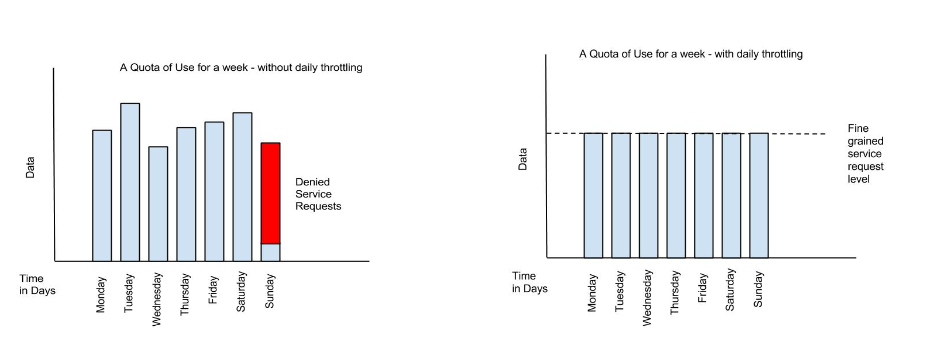
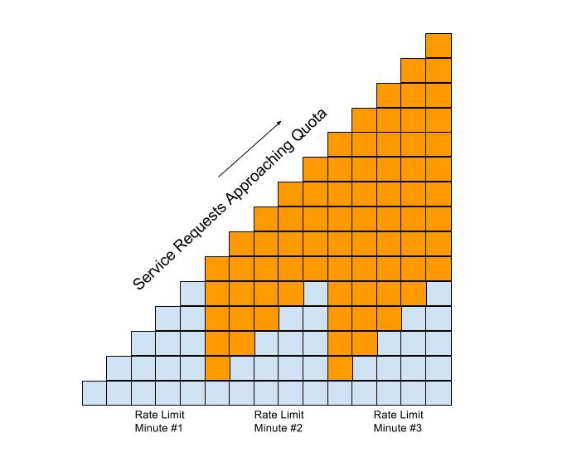
Limiting the total number of API requests within a period of time is a straightforward task and can be configured in a quota policy. This policy, however, may not have the desired effect as the quota may be reached early in the defined time period. If this happens, the requests made to the API during the remainder of the (typically long) time period will be blocked by the policy. A better way to deal with a situation like this is to implement a more flexible approach where the monthly quota policy is combined with a fine grained rate limiting policy that will act as a throttle on the traffic.
To illustrate, there are about 2.5 million seconds in a month. If we want to set the API request quota for a month to 1/2 million, then we can also set a rate limit policy to a limit of 5 requests per second to ensure that API requests are throttled and the API can be accessed throughout the entire month.
Here’s a visual view of a rate limiting policy based on a time period of one week. If we define a weekly quota, there is no guarantee that users will not consume that quota before the week is over. This will result in an API’s requests being denied at the end of the week. In contrast, if we augment the weekly quota with a more fine grained policy, we can maintain the API’s ability to respond to requests throughout the week:
|
Policies can be configured to work together in combinations. |
The ability to throttle API requests based on API request counts and bytes transferred provides even greater flexibility in implementing policies. APIs that transfer larger amounts of data, but rely on fewer API requests can have that data transfer throttled on a per byte basis. For example, an API that is data intensive, will return a large amount of data in response to each API request. The API may only receive a request a few hundreds of times a day, but each request may result in several megabytes of data being transferred. Let’s say that we want to limit the amount of data transferred to 6GB per hour. For this type of API, we could set a rate limiting policy to allow for one request per minute, and then augment that policy with a transfer quota policy of 100Mb per hour.
Before we move on, let’s look at how we can combine multiple policies into a plan.
It’s important to keep in mind that a plan can contain multiple policies. For our example, we’ll create both a “gold” plan and a “silver” plan. In a real-world situation, gold and silver level plans might look something like this:
Gold plan |
|
Silver plan |
|
This diagram lets us visualize how the two policies will work together:
In this diagram, each filled in box represents one API request. The important thing to understand is how the policies work together to enable you to have flexible throttling of requests to your API:
-
The fine grained rate limit is reset at the end of the time period defined for the rate limit policy
-
And, the total number of API requests continue to be applied to the defined quota until the quota policy time limit is reached.
Other Policies
There are many other policies offered by Apiman, each of them performing a specific task. And more policies are added with every release! Even more interesting, you can add your own custom policies using Apiman’s excellent plugin framework (more on that later). You can refer to the Apiman User Guide for a full list of official policies, what each policy does, and how to configure it.
Section 3 - Providing APIs
Publishing APIs
When an API is published to the API Gateway, the API is made available to the client apps that are the consumers of APIs. There are two different ways to publish an API:
Publishing an API as Public API - Public APIs can be directly accessed by any client, without providing an API Key. This allows you to distribute the URL that is used to access the API through through the API Gateway. The URL for a managed Public API takes this form:
http://gatewayhostname:port/apiman-gateway/\{organizationId}/\{API ID}/\{API version}/Public APIs are also very flexible in that they can be updated without being re-published. Unlike APIs published through Plans, Public APS can be accessed by a client app without requiring API consumers to agree to any terms and conditions related to a contract defined in a plan for the API. It is also important to note that when an API is Public, only the policies configured on the API itself will be applied by the API Gateway.
Publishing an API through Plans - In contrast to Public APIs, these APIs, once published, must be accessed by a Client App via its API key. In order to gain access to an API, the Client App must create a contract with an API through one of the API’s configured Plans. Also unlike Public APIs, APIs that are published and accessed through its Plans, once published, cannot be changed. To make changes, new versions of these APIs must be created.
Security for APIs - Policy and Endpoint Security
One important aspect of all APIs that are managed by the API Gateway is the security that the API Gateway provides. Let’s next take a look at the different types of security that are available.
The authentication policy type provides username/password security for clients as they access the managed API through the API Gateway, but it does not protect the API from unauthorized access attempts that bypass the Gateway completely. To make the API secure from unauthorized client applications, endpoint level security should also be configured.
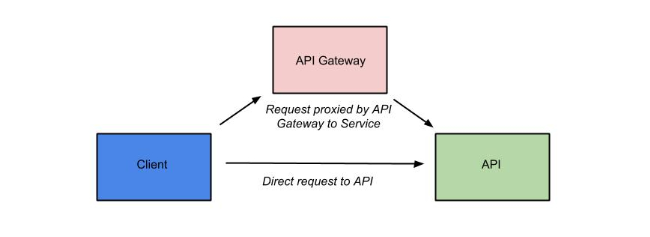
The best way to start our discussion of the different, but complementary types of security that we’ll examine in this article is with a diagram. The nodes involved are the client applications that will access our APIs, the Apiman API Gateway, and the servers that host our APIs:
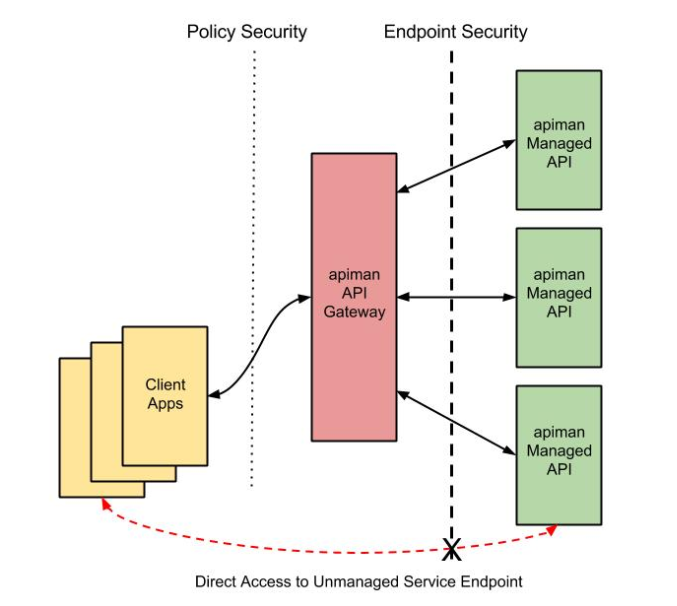
Let’s work our way through the diagram from left to right and start by taking a look at Policy Level Security.
Policy Level Security
Policy level security, such as that provided by an Authentication policy, secures the left side of the diagram, that is the communication channel between the applications and the API Gateway. In this communication channel, the applications play the role of the client, and the API Gateway plays the role of the server.
We also want to secure the right side of the diagram, where the API Gateway plays the role of a client, and the APIs play the role of the servers.
| It’s worth noting that while policy security protects the managed API, it does nothing to protect the unmanaged API as this API can be reached directly, without going through the API Gateway. This is illustrated by the red line in the diagram. So, while access to the managed API through the Apiman API Gateway is secure, policy security does not secure the unmanaged API endpoint. |
Endpoint Level Security
In contrast to policy level security, with endpoint security we are securing the right side of the diagram. Current Apiman supports two endpoint security options:
-
BASIC Authentication
-
MTLS (two-way SSL)
A recent post by Marc Savy to the Apiman blog described how to configure Mutually Authenticated TLS (Transport Layer Security) between the API Gateway and the managed APIs. With Mutual TLS, bi-direction authentication is configured so that the identities of both the client and server are verified before a connection can be made.
We should also note that, unlike policy security, endpoint security also secures the APIs from attempts to bypass the API Gateway. With Mutual TLS, a two-way trust pattern is created. The API Gateway trusts the APIs and the APIs trust the API Gateway. The APIs, however, do not trust the client applications. As is shown by the large “X” character that indicates that an application cannot bypass the API Gateway and access the APIs directly.
One last point that is important to remember is that the endpoint level of security applies to all requests made to the APIs, regardless of the policies configured.
|
Policy security alone does not secure an API’s unmanaged endpoints. |
To summarize, the differences between policy level security and endpoint level security are:
| Policy Level Security | End Point Level Security |
|---|---|
Secures communications between the applications (clients) and API Gateway (server) |
Secures communications between the API Gateway (client) and APIs (servers) |
Configured in an API Gateway policy |
Configured for the API Gateway as a whole in |
Applied by a policy at runtime |
Enabled for all API requests, regardless of the policies configured for an API |
Does not secure the unmanaged API from access by unauthorized clients |
Secures the unmanaged API endpoints from access by unauthorized clients |
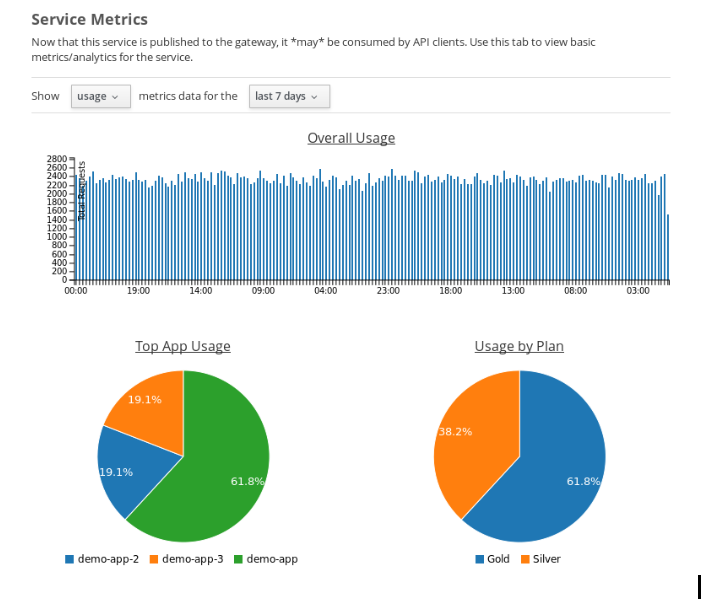
API Metrics
After you’ve created and published your APIs, you will want to be able to keep track of the level of use they are receiving. To fulfill this need, Apiman provides you with API metrics. The metrics track the following information:
-
Request start and end times
-
API start and end times (i.e. just the part of the request taken up by the back end API)
-
Resource path
-
Response type (success, failure, error)
-
API info (org id, id, version)
-
Client App info (org id, id, version)
-
Bytes uploaded/downloaded
API Metrics can be accessed in the Management UI and through the REST API. The metrics are displayed visually in the Management UI, for example:
Section 4 - Consuming APIs
Invoking Managed APIs
From a client app’s perspective, the only difference between accessing a managed API and another API is the URL of the API’s endpoint. As we mentioned earlier in this crash course, a managed Apiman endpoint takes this form:
http://gatewayhostname:port/apiman-gateway/\{organizationId}/\{API ID}/\{API version}/In addition, if the API is not Public, then the managed API endpoint must include a Client App’s API Key, either as a query parameter in the URL or as an HTTP header. For example:
http://localhost:8080/apiman-gateway/ACMEServices/echo/1.0?apikey=c374c202-d4b3-444206e3d| Don’t panic! You don’t have to memorize the endpoint string. As we’ll see in a bit, the endpoint string is provided to you by Apiman. |
Managing Client Applications and Contracts
Public APIs can be consumed by any client. APIs that are not public can only be consumed by client applications that exist in an Apiman organization and are registered with Apiman.
When you create a client app in the Management UI, you are able to perform a search through all published APIs to locate the API that you want the client app to consume. The Management UI allows you to select from all published versions of an API, and from all the defined plans for an API. (Remember that, in this context, a plan is a set of policies that the API enforces.) Note that client apps can have configured policies, the same manner as plans and APIs.
Once you find an API that you want your client app to consume, and after you select the version of the API and the plan that you want to govern how your client app will consume the API, you use the Management UI to create an API contract. The contract contains the “Terms and Conditions” defined by the API provider that govern your client app’s use of the API.
Your client app can consume one or more API. Once your client app has created contracts with all of the APIs it needs to consume, it must be registered with the Gateway. This enables the Gateway to know which contracts are valid and how to create the full policy chain it will apply to the request.
Section 5 - Managing Apiman
Users and Roles
In the Apiman data model, all data elements exist in the context of the organization. The same holds true for user memberships as users can be members of multiple organizations. Permissions in Apiman are role based. The actions that a user is able to perform are dependent on the roles to which the user is assigned when she is added as a member of an organization.
Let’s start by looking at the roles that are preconfigured in Apiman.
Understanding OOTB Apiman user roles
In Apiman, each role defines a set of permissions granted by that role. When a user is made a member of an organization, that user must be assigned to a role. A role definition consists of a name and description, and, most importantly, a set of permissions that govern the user’s ability to view, edit, and administer the organization itself, as well as the organization’s plans, APIs, and applications.
Role Definitions are managed in the Roles section of the Apiman System Administration section of the Management UI.
Apiman is preconfigured with the following roles:
-
Organization Owner
-
API Developer
-
Client App Developer
These role names are self-explanatory. For example, a user assigned the Client App Developer role is able to manage the organization’s client apps but is blocked from managing its APIs or plans.
The full set of permissions provided in Apiman by these preconfigured roles are:
| Preconfigured Role | Who Should be Assigned this Role | Permissions Granted by this Role |
|---|---|---|
Client App Developer |
Users responsible for creating and managing client apps. |
|
Organization Owner |
Automatically granted to the user who creates an Organization. Can be granted to other users by an existing Organization Owner. |
(all permissions) |
API Developer |
Users responsible for creating and managing APIs. |
|
Organization owners can assign roles to users through the Manage Members form in the Apiman Management UI (found off the Members tab for an Organization). Each user must be assigned at least one role, but users can also be assigned multiple roles.
While Apiman admin users can also modify the permissions as defined for these preconfigured roles, it is also very easy to create new custom roles.
Creating a New User Role/Defining the Role Permissions
Custom roles give you the ability to exercise fine-grained control over the set of permissions granted to users.
Let’s look at an example of a custom role. Imagine a situation where you have API developer users and client app developer users. These sets of users can rely on Apiman’s preconfigured roles. Let’s also imagine that you have a third set of user. You want these users to have read access to APIs and applications so that they can participate in a review/approval process. However, you do not want to give these users write access. You can create a view-only (read-only) role these users by configuring your custom Role Definition to only grant the Client App View and API View permissions.
Managing Policies and Plugins
Apiman is preconfigured with a core set of policies, but also supports adding more policies by installing one or more plugin. There are a number of official Apiman plugins which will enable additional policies to be configured. Some examples of the official Apiman plugin policies include (but are not limited to):
-
CORS - This plugin implements CORS (Cross-origin resource sharing): A method of controlling access to resources outside of an originating domain.
-
HTTP Security - Provides a policy which allows security-related HTTP headers to be set, which can help mitigate a range of common security vulnerabilities.
-
JSONP - A plugin that contributes a policy that turns a standard RESTful endpoint into a JSONP compatible endpoint.
-
Keycloak OAuth - This plugin offers an OAuth2 policy which leverages the Keycloak authentication platform as the identity and access provider.
-
Log Headers - Offers a simple policy that allows request headers to be added or stripped from the HTTP request (outgoing) or HTTP response (incoming).
These optional plugins are accessed in the administrative page in the Apiman Management UI. You can install these policies as needed, and then uninstall them when they are no longer needed.
There are a couple of caveats to keep in mind when you uninstall a policy plugin:
-
First, uninstalling the plugin removes it from the Apiman Management UI, but it still remains in use for all APIs in which it was previously configured.
-
Second, if you want to completely remove the plugin from all APIs in which it was previously configured, you must manually click on each API, Plan, and Client App that uses the policy and remove it. Apiman does not include a single “kill” button to automatically remove all references to a policy.
In addition to enabling you to create and install your own custom policies, Apiman also provides a mechanism to upgrade to new versions of those policies. This is an especially useful feature as, over time, a policy may be upgraded to include bug fixes or new features.
Managing Gateways
When you install Apiman, it’s configured with one API Gateway. Apiman, however, enables you to configure and use multiple API Gateways simultaneously. There are several reasons why you might want to configure multiple API Gateways:
-
It’s a good practice to maintain separate test and production environments for Apiman. A test environment provides you with a safe place to experiment with the design of plans and custom policies without causing any interruption in service for APIs that are use for mission-critical production environments.
-
If some APIs are used more heavily than others, you might want to group these APIs and configure an API Gateway for them on higher performance servers, or base these APIs on API Gateways located in geographic locations closer to their highest use Client apps.
Note that typically you will want to set up a single Gateway which is actually backed by multiple nodes/instances. Each instance (e.g. running on WildFly) should be configured to use the same backing storage (e.g. Elasticsearch or JDBC). This configuration results in a single “logical” gateway in Apiman - so only one (1) gateway needs to be configured in the UI - when an API is published to one of the nodes, it will be available to them all.
Apiman REST API
It’s inevitable that, after you work with a product’s UI for a while that you encounter tasks that are better suited to a scripting or batch interface. For example, if you have to perform a similar task for a large number of related data items, the time that it can require to perform these tasks through an interactive UI can be prohibitive. Also, it’s easy for repetitive tasks to become error prone as you can lose focus, even if you are working in a well designed and easy to use interface such as Apiman.
One solution to this problem is to augment the UI with a command line or scripting interface. This can lead to a whole separate set of issues if the new interface is built on a different set of underlying routines than the UI. A better approach is to allow access to the same routines in which the UI is constructed. This approach removes any duplication, and also enables you to replicate manual UI based tasks with automated or scripted tools.
Apiman follows this second approach with its REST interface. All of the functionality provided by Apiman in its Management UI are directly supported in the API Manager REST API In fact, the UI simply makes calls to the REST layer in order to get data or make changes.
|
You can use the REST interface to automate any task that is performed in the UI. |
The documentation for the Apiman REST API is available (for free, of course), here: www.apiman.io/latest/api-manager-restdocs.html
Section 6 - Getting Up and Running with Apiman in 10 minutes
In this section, we’ll also take a very hands-on look at Apiman. In about 10 minutes, we’ll get Apiman installed and running, define an API policy, create and publish an API, register an application, and watch Apiman enforce that policy.
Let’s start by installing the prerequisite software packages that we will need.
Prerequisite Software Required
Like all JBoss middleware projects, you can run Apiman on any operating system that supports Java software development. We don’t need very much in the way of prerequisite software to run Apiman out of the box. (Note that there really isn’t a physical box as you can just download everything.)
What you will need to install to run Apiman and follow all the steps in this chapter are: * Java - Apiman can run Java version 1.8 or newer. You will want to install the full Java JDK. You can use either OpenJDK or Oracle’s JDK. * Apache Maven - While you do not need the maven build tool to run Apiman, we will use it to build an example API. You should download and install maven version 3.3 or newer.
We don’t need very much to run Apiman out of the box. Before we install Apiman, you’ll have to have Java (version 1.8 or newer, in this section we’ll use Java 1.8) installed on your system. You’ll also need to install git and maven installed to be able to build the example API that we’ll use.
After you install the prerequisite software, the next thing we have to do is to get ourselves a copy of Apiman.
Getting the Bits - Downloading Apiman
To download Apiman, open a browser and navigate to www.apiman.io
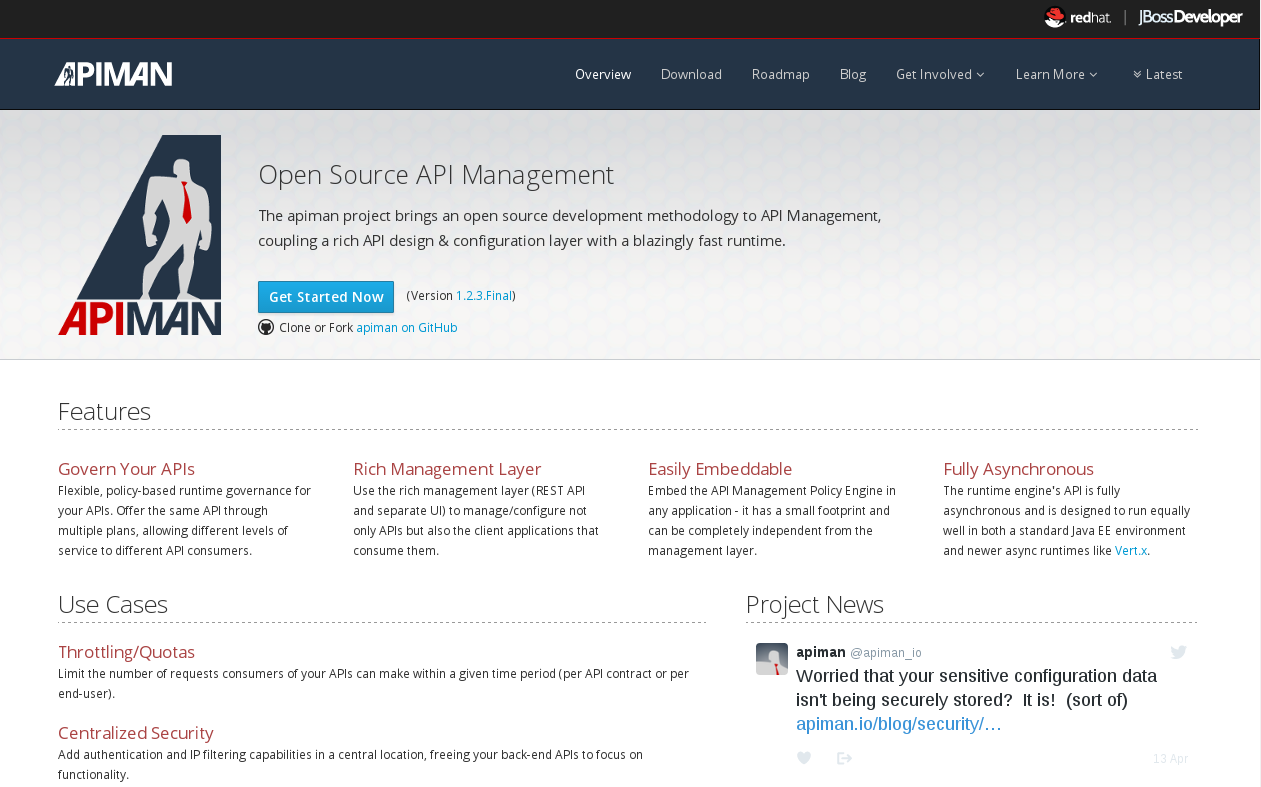
The phrase “running an Apiman server” is a bit misleading, as Apiman itself is not a server. Apiman is distributed in multiple forms. We’ll examine and use each of these forms in this book:
-
Apiman WildFly Overlay - In this distribution, Apiman is packaged in a zip file that is installed over a JBoss WildFly (wildfly.org/) server.
-
Docker - In this distribution, Apiman is packaged as Docker (www.docker.com/) images.
We’ll keep things simple in this chapter and use the Apiman WildFly Overlay distribution. (You can also download Apiman packaged as a Docker image.) If you navigate to the “downloads” page, you’ll see:
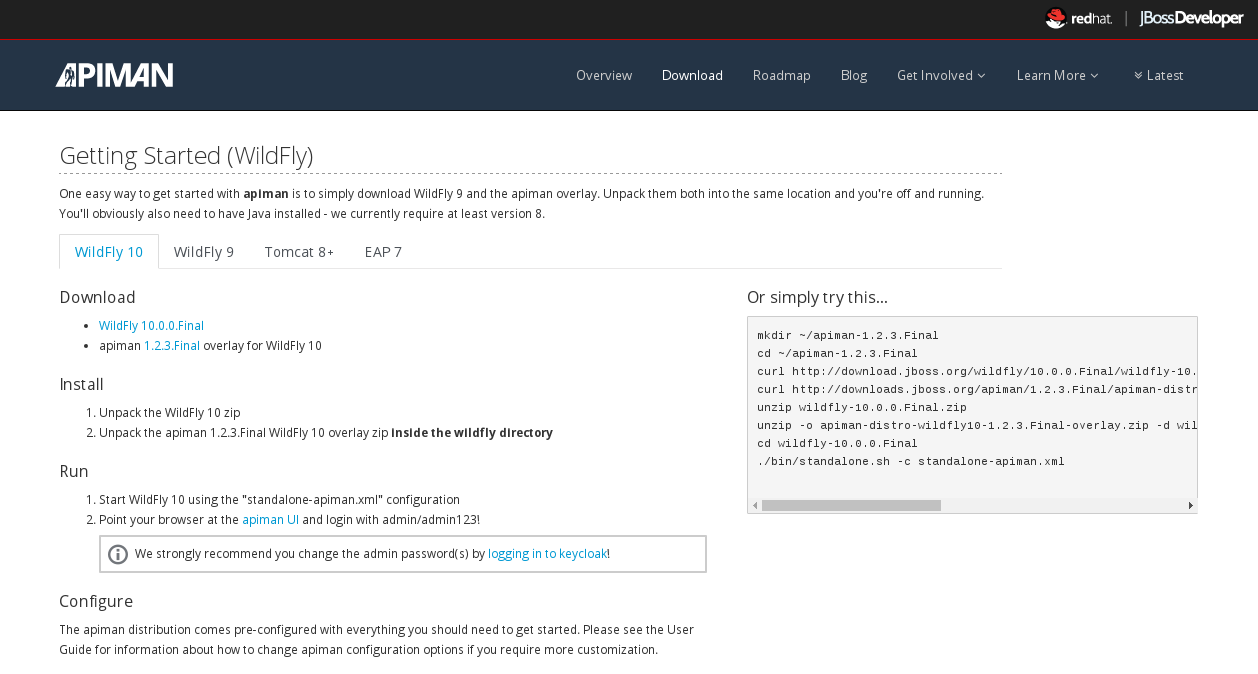
Let’s take a look at the contents of the WildFly Overlay. There are three main directories in the WildFly Overlay:
The Apiman directory - This directory contains configuration data specific to Apiman such as the DDL (Data Description Language) files that define database schemas used by Apiman, JSON files that define policy and security settings, and a quickstart example program that we will use as an example API. The Apiman directory is a new directory that is created when you unzip the WildFly Overlay file. The top level directories in the Apiman directory look like this:
├── apiman
│   ├── data
│   │   ├── all-policyDefs.json
│   │   └── apiman-realm.json
│   ├── ddls
│   │   ├── apiman_mysql5.ddl
│   │   └── apiman_postgresql9.ddl
│   ├── quickstarts
│   │   ├── echo-service
│   │   ├── LICENSE
│   │   ├── pom.xml
│   │   └── README.md
│   └── sample-configs
│       ├── apiman-ds_mysql.xml
│       └── apiman-ds_postgresql.xml
The modules directory - This directory contains configuration files, including Keycloak (URL) configuration files that are added to the WildFly server for Apiman. These files are added to the WildFly “standalone” server configuration . The top levels in this directory look like this:
├── modules
│   └── system
│       └── layers
└── standalone
 ├── configuration
 │   ├── apiman.jks
 │   ├── apiman.properties
 │   ├── keycloak-server.json
 │   ├── providers
 │   ├── standalone-apiman.xml
 │   ├── standalone-keycloak.xml
 │   └── themes
 ├── data
 │   ├── es
 │   ├── h2
 │   └── keycloak.h2.db
The deployments directory - This directory contains the Apiman API Gateway, back end APIs, and Apiman Management UI, packaged as .war files. By unzipping the WildFly Overlay file, these .war files are deployed to the WildFly server. The top levels in this directory look like this:
├── deployments
     ├── apiman-ds.xml
     ├── apiman-es.war
     ├── apiman-gateway-api.war
     ├── apiman-gateway.war
     ├── apimanui.war
     └── apiman.war
Make a mental note of these Apiman deployment files. We’ll see them again in a few minutes.
The Apiman download page is here: www.apiman.io/latest/download.html
The steps you follow are:
-
Download and Unzip the WildFly Server - Download
download.jboss.org/wildfly/10.1.0.Final/wildfly-10.1.0.Final.zipand unzip the file into the directory in which you want to run the sever. -
Download and unzip the Apiman WildFly overlay .zip file - Download the Apiman WildFly overlay zip file into the directory that was created when you unzipped the WildFly download.
-
The Apiman WildFly overlay zip file is available here:
github.com/apiman/apiman/releases/download/1.5.7.Final/apiman-distro-wildfly-1.5.7.Final-overlay.zip -
After the file is downloaded, unzip it directly over the directory into which you unzipped the WildFly download. This will install Apiman into the WildFly server.
-
Installing Apiman on an WildFly Server
The commands that you will execute to install the server will look something like this:
mkdir ~/apiman-1.5.7.Final
cd ~/apiman-1.5.7.Final
wget https://download.jboss.org/wildfly/10.1.0.Final/wildfly-10.1.0.Final.zip
wget https://github.com/apiman/apiman/releases/download/1.5.7.Final/apiman-distro-wildfly-1.5.7.Final-overlay.zip
unzip wildfly-10.1.0.Final
unzip -o apiman-distro-wildfly-1.5.7.Final-overlay.zip -d wildfly-10.1.0.Final
Before we move on, we have one server administration task to perform. We have to create a server user, so that we can log onto the server administrative console. This is necessary as WildFly does not come pre-installed with any users.
To create a new server user, navigate to this directory:
cd apiman-1.5.7.Final/wildfly-10.1.0.Final/binAnd execute this script:
./add-user.shWhen you are prompted for the type of user to create, select Management User:
What type of user do you wish to add?
a) Management User (mgmt-users.properties)
b) Application User (application-users.properties)
(a):
After you define a username and password, for the remainder of the prompts, you can safely take the default values, or select “yes” to complete the creation of a user account.
(Details on the administration of a WildFly server, including user management, are out of scope for this book as our focus is Apiman. If you are interested in learning more about WildFly server administration, refer to the WildFly Server Administration Guide.
Running the WildFly Server
To start the WildFly server, you navigate back to the directory into which you installed the server, execute these commands - note that in this context, “standalone” refers to a standalone (i.e., non-clustered) WildFly server. You can learn more about WildFly server configuration options in the WildFly Server Administration Guide:
cd apiman-1.5.7.Final/wildfly-10.1.0.Final
./bin/standalone.sh -c standalone-apiman.xml
When the server starts, it will write logging messages (a lot of messages!) to the screen. The server will also create a server log file with these messages. When you see some messages that look like this, you’ll know that the server is up and running with apiman installed:
"apiman-gateway.war")
23:28:49,091 INFO  [org.jboss.as] (Controller Boot Thread) WFLYSRV0060: Http management interface listening on http://127.0.0.1:9990/management
23:28:49,091 INFO  [org.jboss.as] (Controller Boot Thread) WFLYSRV0051: Admin console listening on http://127.0.0.1:9990
23:28:49,091 INFO [org.jboss.as] (Controller Boot Thread) WFLYSRV0025: WildFly Full 10.1.0.Final started in 11891ms - Started 1131 of 1543 services (616 services are lazy, passive or on-demand)Congratulations! Your WildFly server is up and running with Apiman installed!
Or is it?
Let’s take a quick look at how we can be sure that the server installation was correct. To do this, we’ll look in two places.
First, we’ll look at the WildFly Server Administrative Console.
Remember the user account that we created? We’ll use it now. To access the WildFly Server Administrative Console, open up a browser, and navigate to: localhost:8080
This page will be displayed:

When you select the Administration Console selection, you will be prompted for the username and password:
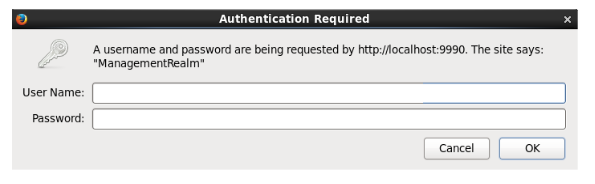
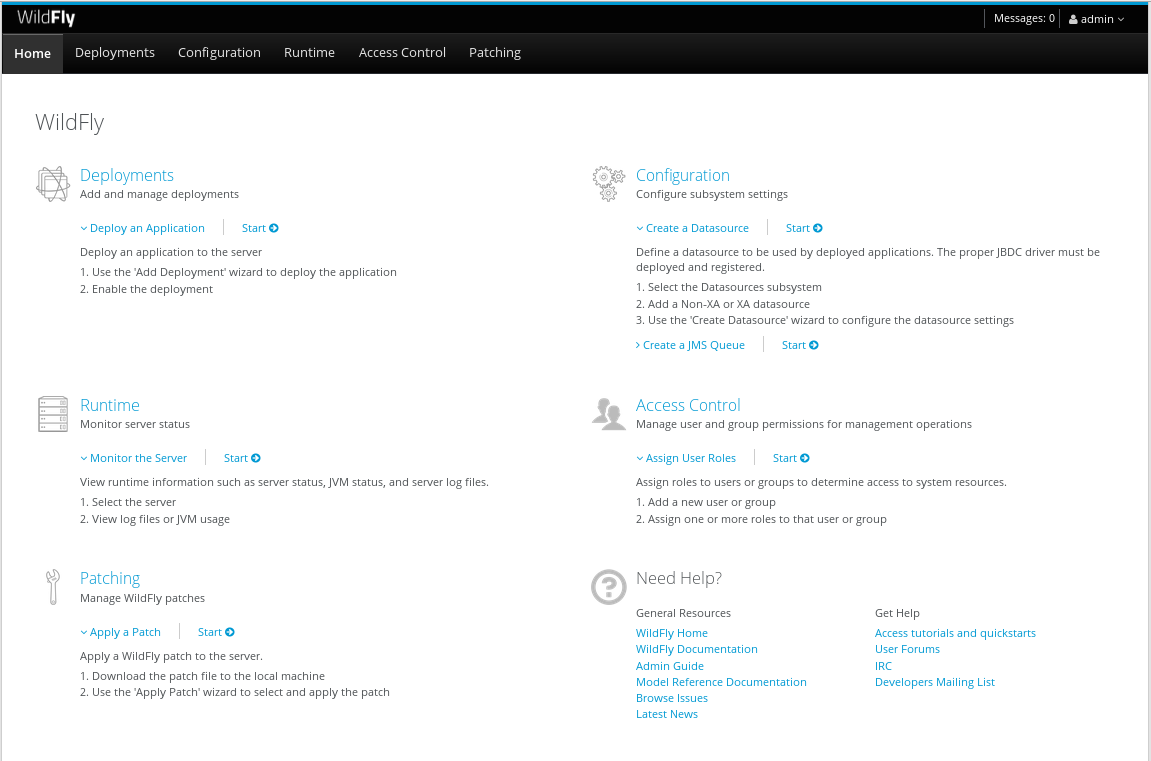
Enter the username and password for the user that you defined (for this example, we used the very unimaginative and insecure username “admin”) and you will brought to the WildFly Server Administration Console:
If you then select the “Deployments” tab at the top of the page, you’ll see the applications deployed to the server. This is where you should see the Apiman deployments for the APIs, Gateway, and Management UI:
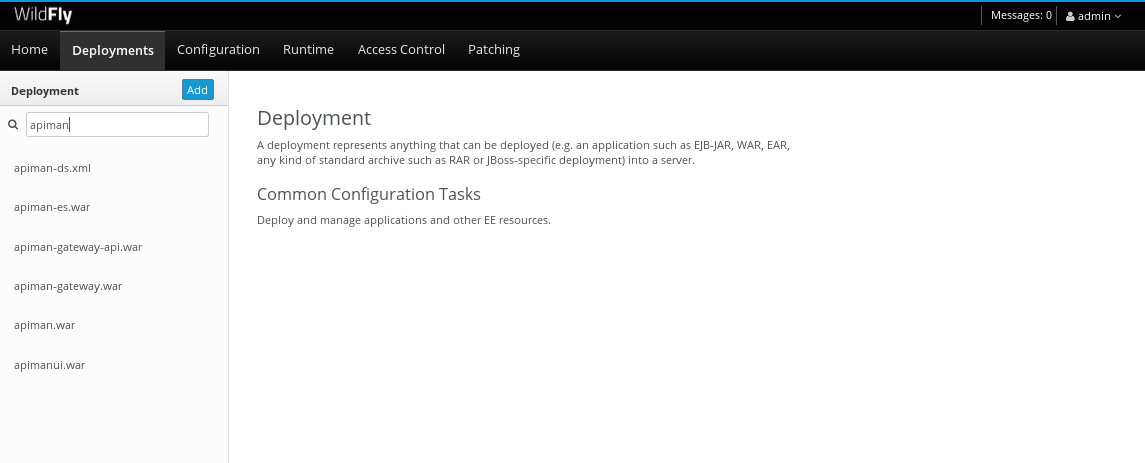
If you don’t see the Apiman deployments, don’t panic, but something went wrong with the installation. The most common reason for the Apiman deployments to be missing is that you unzipped the Apiman overlay .zip file into a different directory from the WildFly server. Remember, that the reason that the overlay file is named “overlay” is that it must be unzipped over an installed WildFly server. You can confirm that this is what happened by looking in the WildFly server’s deployment directory here: wildfly-10.1.0.Final/standalone/deployments
If you look in this directory, you should see these files (the presence of files with the “.deployed” suffix indicates that the corresponding file was deployed successfully):
apiman-ds.xml
apiman-ds.xml.deployed
apiman-es.war
apiman-es.war.deployed
apiman-gateway-api.war
apiman-gateway-api.war.deployed
apiman-gateway.war
apiman-gateway.war.deployed
apimanui.war
apimanui.war.deployed
apiman.war
apiman.war.deployed
So, if you don’t see the Apiman deployments, stop the server and start the installation over. Be careful to unzip the Apiman overlay file directly over the directory created when you unzipped the WildFly server .zip file.
The second place we’ll look for evidence that the installation was successful is the WildFly server’s server.log file.
The WildFly server’s server.log file is created when the server is started. All the information that is displayed on the screen when you started the server is also written to the log file. (The level of detail written to the console and the log file is configurable. You can read about configuring WildFly logging here: docs.jboss.org/author/display/WFLY10/Admin+Guide)
You can find the WildFly server file here: wildfly-10.1.0.Final/standalone/log/server.log
The WildFly server log file can be quite large as the server will append more logging statements to it over time. While you can certainly read the entire file anytime you want, we’ll focus on some highlights related to ensuring that the server started cleanly. An obvious first step is to search the file for logging statements written at the ERROR level. If the file does not contain any errors, you can look for statements that look like this to confirm that the server started cleanly:
23:28:48,978 INFO  [org.wildfly.extension.undertow] (ServerService Thread Pool -- 71) WFLYUT0021: Registered web context: /apiman-es
23:28:49,000 INFO  [org.jboss.as.server] (ServerService Thread Pool -- 36) WFLYSRV0010: Deployed "apiman-gateway-api.war" (runtime-name : "apiman-gateway-api.war")
23:28:48,999 INFO  [org.jboss.as.server] (ServerService Thread Pool -- 60) WFLYSRV0010: Deployed "keycloak-server.war" (runtime-name : "keycloak-server.war")
23:28:49,000 INFO  [org.jboss.as.server] (ServerService Thread Pool -- 36) WFLYSRV0010: Deployed "apiman.war" (runtime-name : "apiman.war")
23:28:49,000 INFO  [org.jboss.as.server] (ServerService Thread Pool -- 36) WFLYSRV0010: Deployed "apiman-es.war" (runtime-name : "apiman-es.war")
23:28:49,001 INFO  [org.jboss.as.server] (ServerService Thread Pool -- 36) WFLYSRV0010: Deployed "apiman-ds.xml" (runtime-name : "apiman-ds.xml")
23:28:49,001 INFO  [org.jboss.as.server] (ServerService Thread Pool -- 36) WFLYSRV0010: Deployed "apimanui.war" (runtime-name : "apimanui.war")
23:28:49,001 INFO  [org.jboss.as.server] (ServerService Thread Pool -- 36) WFLYSRV0010: Deployed "services.war" (runtime-name : "services.war")
23:28:49,001 INFO  [org.jboss.as.server] (ServerService Thread Pool -- 36) WFLYSRV0010: Deployed "authtest-ds.xml" (runtime-name : "authtest-ds.xml")23:28:49,001 INFO  [org.jboss.as.server] (ServerService Thread Pool -- 36) WFLYSRV0010: Deployed "apiman-gateway.war" (runtime-name :
That’s right, it’s the same Apiman deployment files. If you see statements like these, and there are no ERROR statements, then you should be able to safely access the WildFly Administration console.
There’s just more point we should cover before moving on. While the server may be up and running, it’s not really configured for production use. As a convenience, when you install Apiman, it is preconfigured with a default administrator account. The username for this account is “admin” and the password is “admin123!” - not exactly a mission critical level of security! If this were a production server, the first thing that we’d do is to change the default Apiman admin username and password. Apiman is configured by default to use JBoss KeyCloak (keycloak.jboss.org/) for password security. Also, the default database used by Apiman to store contract and API information is the H2 in-memory database. For a production server, you’d want to reconfigure this to use a production database. We’ll cover Apiman server security and production configuration settings in later chapters.
The Echo API “Quickstart”
The source code for the example service is contained in a git repo (git-scm.com) hosted at GitHub (github.com/apiman). To download a copy of the example service, navigate to the directory in which you want to build the service and execute this git command:
git clone git@github.com:apiman/apiman-quickstarts.git
As the source code is downloading, you’ll see output that looks like this:
git clone git@github.com:apiman/apiman-quickstarts.git
Initialized empty Git repository in apiman-quickstarts/.git/
remote: Counting objects: 104, done.
remote: Total 104 (delta 0), reused 0 (delta 0)
Receiving objects: 100% (104/104), 18.16 KiB, done.
Resolving deltas: 100% (40/40), done.
The source code for the example API is provided in the wildfly-10.1.0.Final/apiman/quickstarts directory. (In JBoss software, the term “quickstart” refers to an example program.)
The echo-API quickstart includes these files:
And, after the download is complete, you’ll see a populated directory tree that looks like this:
└── apiman-quickstarts
	├── echo-service
	│   ├── pom.xml
	│   ├── README.md
	│   └── src
	│   	└── main
	│       	├── java
	│       	│   └── io
	│       	│   	└── apiman
	│       	│       	└── quickstarts
	│       	│           	└── echo
	│       	│               	├── EchoResponse.java
	│       	│               	└── EchoServlet.java
	│       	└── webapp
	│           	└── WEB-INF
	│               	├── jboss-web.xml
	│               	└── web.xml
	├── LICENSE
	├── pom.xml
	├── README.md
	├── release.sh
	└── src
 	└── main
     	└── assembly
         	└── dist.xml
As we mentioned earlier, the example API is very simple. The only action that the API performs is to echo back in responses the meta data in the REST requests that it receives.
Maven is used to build the API. To build the API into a deployable .war file, navigate to the directory into which you downloaded the API example:
cd apiman-quickstarts/echo-serviceAnd then execute this maven command:
mvn packageAs the API is being built into a .war file, you’ll see output that looks like this:
[INFO] Scanning for projects...
[INFO]
[INFO] ------------------------------------------------------------------------
[INFO] Building apiman-quickstarts-echo-service 1.2.4-SNAPSHOT
[INFO] ------------------------------------------------------------------------
[INFO]
[INFO] --- maven-resources-plugin:2.7:resources (default-resources) @ apiman-quickstarts-echo-service ---
[INFO] Using 'UTF-8' encoding to copy filtered resources.
[INFO] skip non existing resourceDirectory  local/redhat_git/apiman-quickstarts/echo-service/src/main/resources
[INFO]
[INFO] --- maven-compiler-plugin:3.2:compile (default-compile) @ apiman-quickstarts-echo-service ---
[INFO] Changes detected - recompiling the module!
[INFO] Compiling 2 source files to  local/redhat_git/apiman-quickstarts/echo-service/target/classes
[INFO]
[INFO] --- maven-resources-plugin:2.7:testResources (default-testResources) @ apiman-quickstarts-echo-service ---
[INFO] Using 'UTF-8' encoding to copy filtered resources.
[INFO] skip non existing resourceDirectory  local/redhat_git/apiman-quickstarts/echo-service/src/test/resources
[INFO]
[INFO] --- maven-compiler-plugin:3.2:testCompile (default-testCompile) @ apiman-quickstarts-echo-service ---
[INFO] No sources to compile
[INFO]
[INFO] --- maven-surefire-plugin:2.12.4:test (default-test) @ apiman-quickstarts-echo-service ---
[INFO] No tests to run.
[INFO]
[INFO] --- maven-war-plugin:2.5:war (default-war) @ apiman-quickstarts-echo-service ---
[INFO] Packaging webapp
[INFO] Assembling webapp [apiman-quickstarts-echo-service] in [ local/redhat_git/apiman-quickstarts/echo-service/target/apiman-quickstarts-echo-service-1.2.4-SNAPSHOT]
[INFO] Processing war project
[INFO] Copying webapp resources [ local/redhat_git/apiman-quickstarts/echo-service/src/main/webapp]
[INFO] Webapp assembled in [37 msecs]
[INFO] Building war:  local/redhat_git/apiman-quickstarts/echo-service/target/apiman-quickstarts-echo-service-1.2.4-SNAPSHOT.war
[INFO]
[INFO] --- maven-source-plugin:2.4:jar-no-fork (attach-sources) @ apiman-quickstarts-echo-service ---
[INFO] Building jar:  local/redhat_git/apiman-quickstarts/echo-service/target/apiman-quickstarts-echo-service-1.2.4-SNAPSHOT-sources.jar
[INFO]
[INFO] --- maven-javadoc-plugin:2.10.1:jar (attach-javadocs) @ apiman-quickstarts-echo-service ---
[INFO]
Loading source files for package io.apiman.quickstarts.echo...
[INFO] Building jar:  local/redhat_git/apiman-quickstarts/echo-service/target/apiman-quickstarts-echo-service-1.2.4-SNAPSHOT-javadoc.jar
[INFO] ------------------------------------------------------------------------
[INFO] BUILD SUCCESS
[INFO] ------------------------------------------------------------------------
[INFO] Total time: 3.061 s
[INFO] Finished at: 2016-04-16T22:13:10-04:00
[INFO] Final Memory: 26M/307M
[INFO] ------------------------------------------------------------------------
If you look closely, near the end of the output, you’ll see the location of the .war file:
local/redhat_git/apiman-quickstarts/echo-service/target/apiman-quickstarts-echo-service-1.2.4-SNAPSHOT.warTo deploy the API, we can copy the .war file to our WildFly server’s deployments directory. After you copy the API’s .war file to the deployments directory, you’ll see output like this generated by the WildFly server:
22:33:59,794 INFO  [org.jboss.as.repository] (DeploymentScanner-threads - 1) WFLYDR0001: Content added at location local/redhat_git/apiman/tools/server-all/target/wildfly-{wildfly-version}/standalone/data/content/31/f9a163bd92c51daf54f70d09bff518c2aeef7e/content
22:33:59,797 INFO  [org.jboss.as.server.deployment] (MSC service thread 1-6) WFLYSRV0027: Starting deployment of "apiman-quickstarts-echo-service-1.2.4-SNAPSHOT.war" (runtime-name: "apiman-quickstarts-echo-service-1.2.4-SNAPSHOT.war")
22:33:59,907 INFO  [org.wildfly.extension.undertow] (ServerService Thread Pool -- 76) WFLYUT0021: Registered web context: /apiman-echo
22:33:59,960 INFO  [org.jboss.as.server] (DeploymentScanner-threads - 1) WFLYSRV0010: Deployed "apiman-quickstarts-echo-service-1.2.4-SNAPSHOT.war" (runtime-name : "apiman-quickstarts-echo-service-1.2.4-SNAPSHOT.war")
Make special note of this line of output:
22:33:59,907 INFO [org.wildfly.extension.undertow] (ServerService Thread Pool -- 76) WFLYUT0021: Registered web context: /apiman-echoThis output indicates that the URL of the deployed example API is:
Remember, however, that this is the URL of the deployed example API if we access it directly. We’ll refer to this as the "unmanaged API" as we are able to connect to the API directly, without going through the API Gateway. The URL to access the API through the API Gateway ("the managed API") at runtime will be different.
Now that our example API is installed, it’s time to install and configure our client to access the server.
Accessing the Example API Through a Client
There are a lot of options available when it comes to what we can use for a client to access our API. We’ll keep the client simple so that we can keep our focus on apiman and simply use a browser as the client. If you enter the API’s URL into a browser, an HTTP GET command will be executed. The response will look like this:
{
  "method" : "GET",
  "resource" : "/apiman-echo",
  "uri" : "/apiman-echo",
  "headers" : {
    "Cookie" : "s_fid=722D028B20E49214-13EAE1456E752098; __utma=111872281.807845787.1452188093.1460777731.1460777731.4; __utmz=111872281.1452188093.1.1.utmcsr=(direct)|utmccn=(direct)|utmcmd=(none); _ga=GA1.1.807845787.1452188093; __qca=P0-404983419-1452188093717; __utmc=111872281",
    "Accept" : "text/html,application/xhtml+xml,application/xml;q=0.9,*/*;q=0.8",
    "Connection" : "keep-alive",
    "User-Agent" : "Mozilla/5.0 (X11; Linux x86_64; rv:38.0) Gecko/20100101 Firefox/38.0",
    "Host" : "localhost:8080",
    "Accept-Language" : "en-US,en;q=0.5",
    "Accept-Encoding" : "gzip, deflate",
    "DNT" : "1"
  },
  "bodyLength" : null,
  "bodySha1" : null
}
Now that our example API is built, deployed and running, it’s time to create the organizations for the API provider and the API consumer. The differences between the requirements of the two organizations will be evident in their Apiman configuration properties.
OK, the preliminaries are over! Now, it’s time to go into the Apiman Management UI and create the Apiman data elements for our demonstration.
Creating Users for the API Provider and Consumer Organizations
Before we create the organizations, we have to create a user for each organization. We’ll start by creating the API provider user. To do this, logout from the admin account in the API Manager UI. The login dialog will then be displayed.
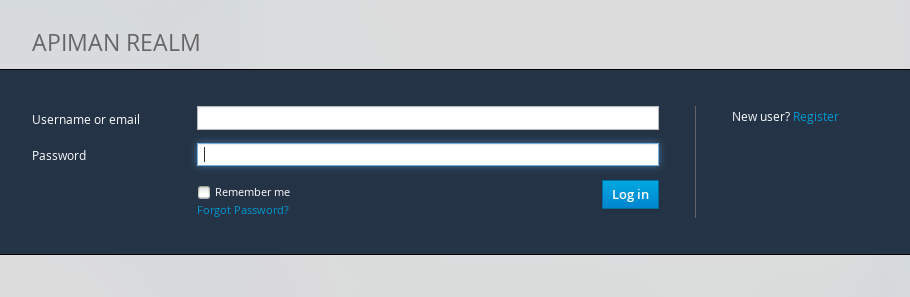
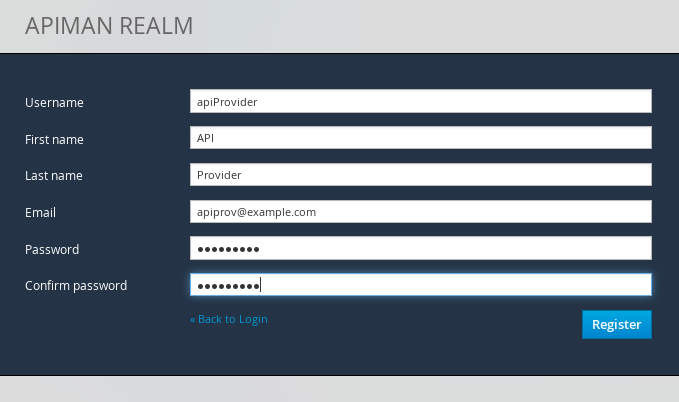
Select the "New user/Register" Option and register the API provider user:
Then, logout and repeat the process to register a new application developer user too:
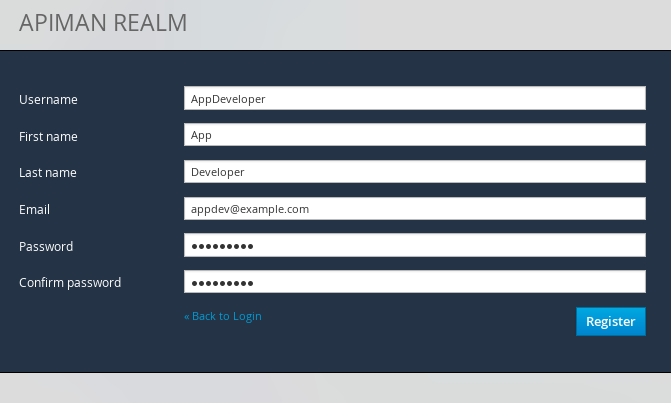
Now that the new users are registered we can create the organizations.
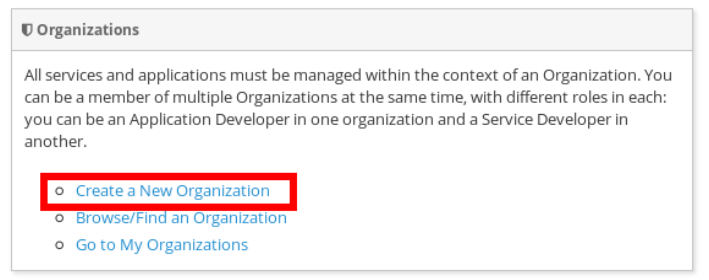
Creating the API Provider Organization
To create the API provider organization, log back into the API Manager UI as the apiprov user and select “Create a new Organization”:
Select a name and description for the organization, and press “Create Organization”:
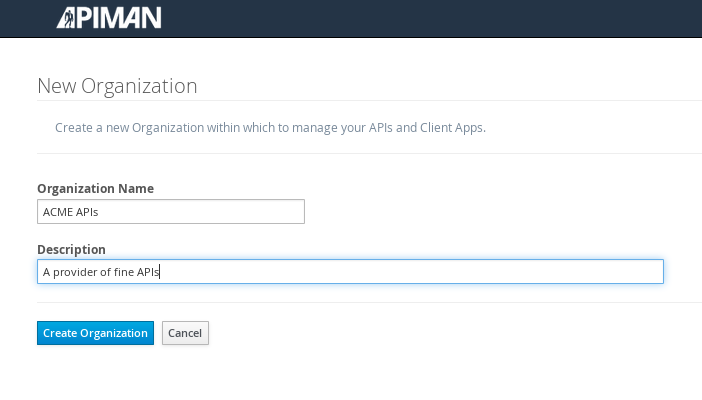
And, here’s our organization:
Note that in a production environment, users would request membership in an organization. The approval process for accepting new members into an organization would follow the organization’s workflow, but this would be handled outside of the API Manager API. For the purposes of our demonstration, we’ll keep things simple.
Configuring the API, its Policies, and Plans
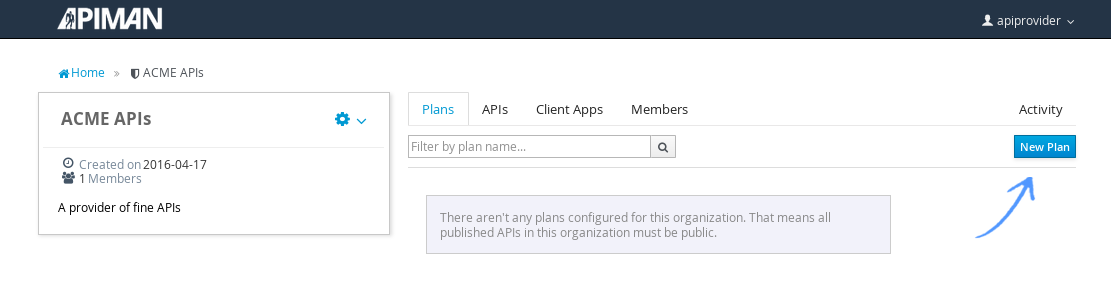
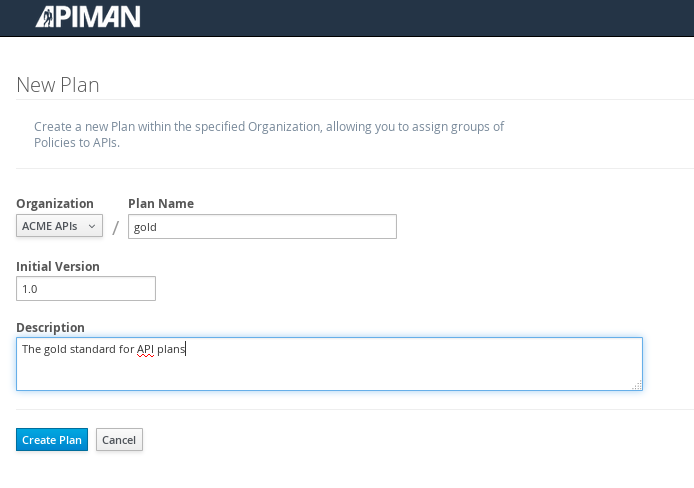
To configure the API, we’ll first create a plan to contain the policies that we want applied by the API Gateway at runtime when requests to the API are made. To create a new plan, select the “Plans” tab. We’ll create a “gold” plan:
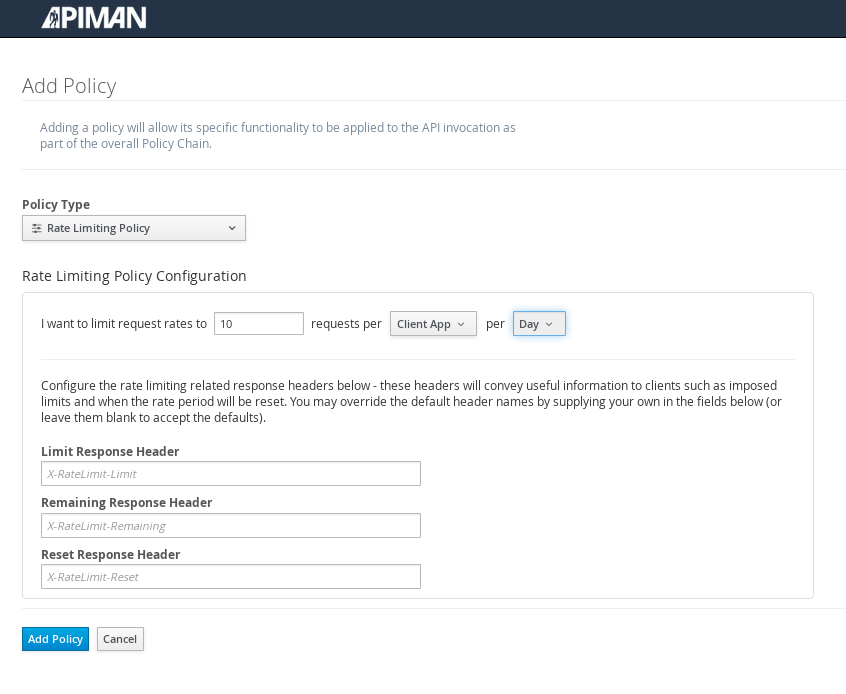
Once the plan is created, we will add policies to it:
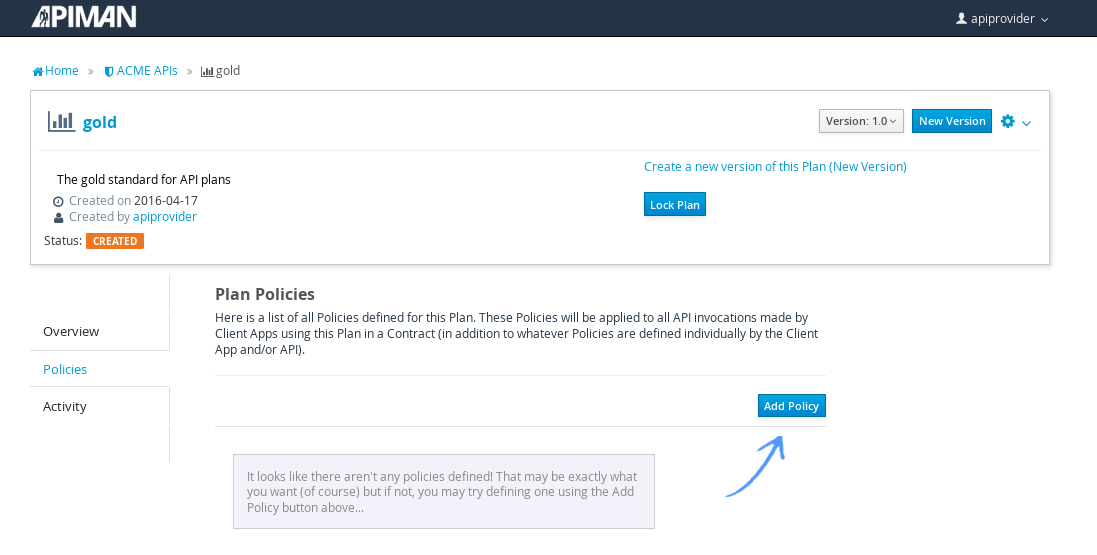
Apiman provides several OOTB policies/plans. Since we want to be able to demonstrate a policy being applied, we’ll select a Rate Limiting Policy, and set its limit to a very low level. If our API receives more than 10 requests in a day/month, the policy should block all subsequent requests. So much for a “gold” level of API!
After we create the policy and add it to the plan, we have to lock the plan:
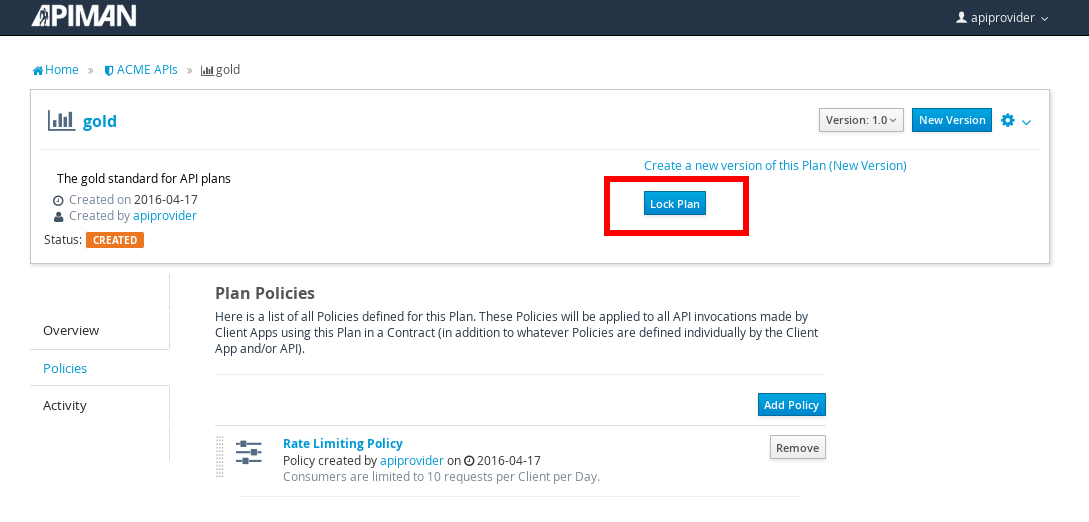
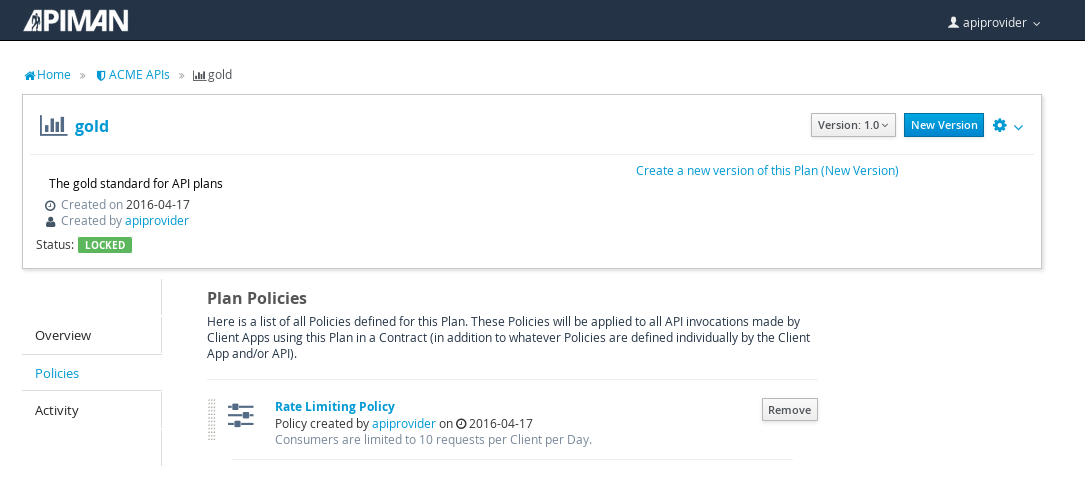
And, here is the finished, and locked plan:
At this point, additional plans can be defined for the API. We’ll also create a “silver” plan, that will offer a lower level of API (i.e., a request rate limit lower than 10 per day/month) than the gold plan. Since the process to create this silver plan is identical to that of the gold plan, we’ll skip the screenshots.
Now that the two plans are complete and locked, it’s time to define the API.
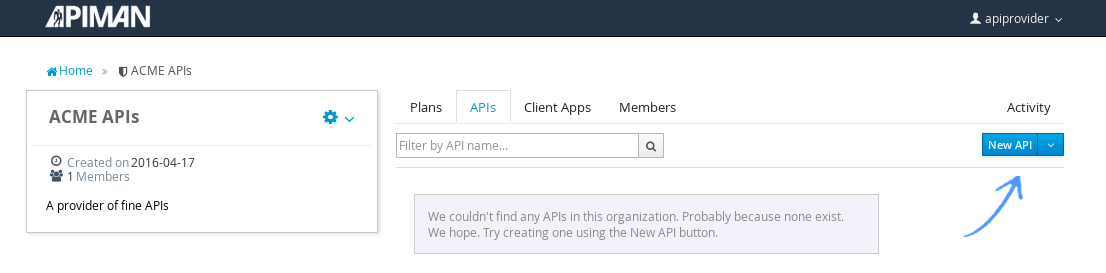
We’ll give the API an appropriate name, so that providers and consumers alike will be able to run a query in the API Manager to find it.
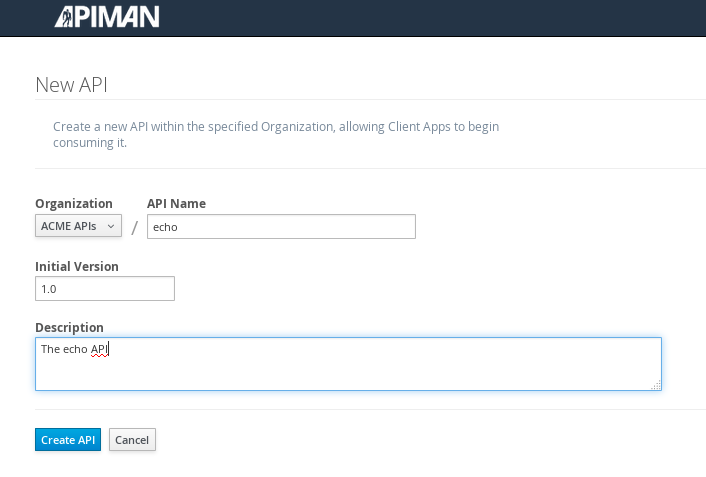
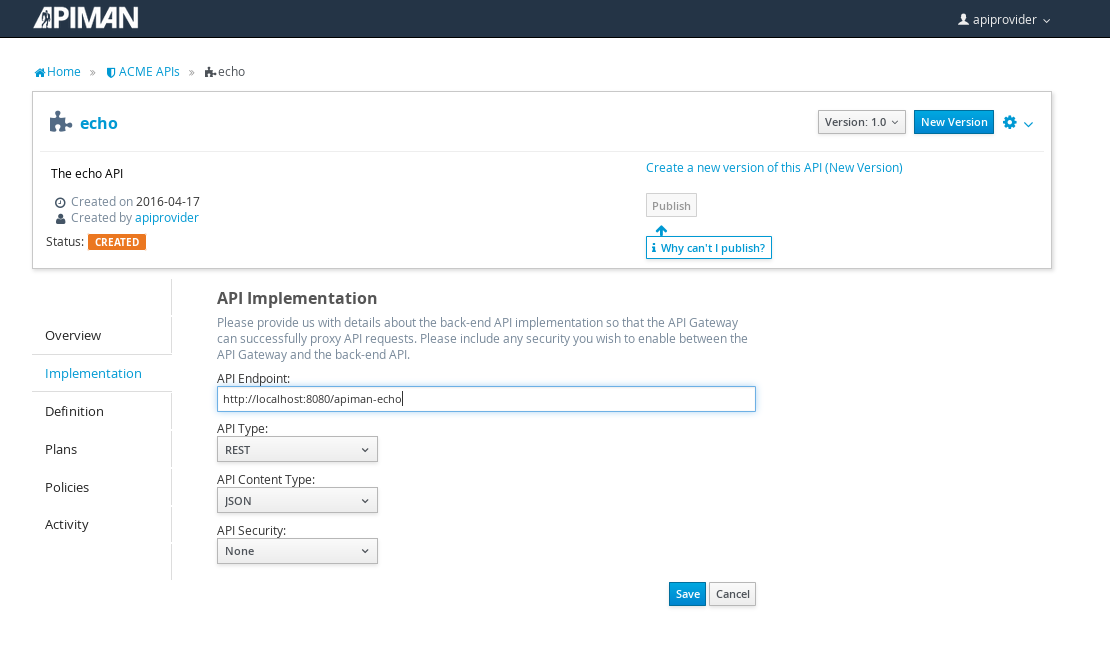
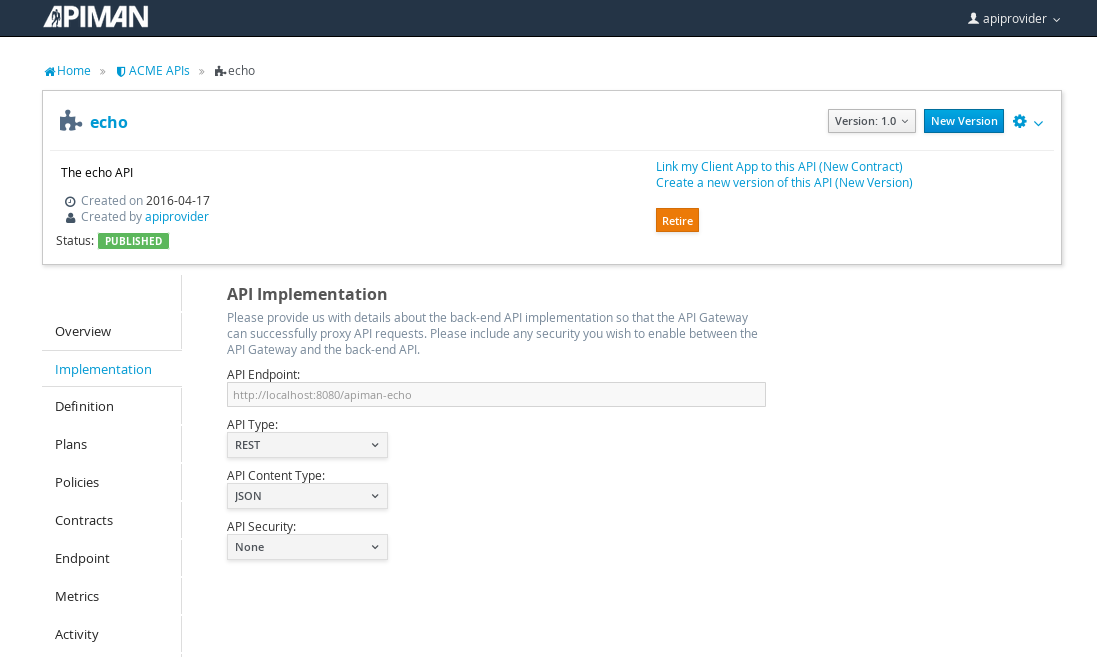
After the API is defined, we have to define its implementation. In the context of the API Manager, the API Endpoint is the API’s direct URL. Remember that the API Gateway will act as a proxy for the API, so it must know the API’s actual URL. In the case of our example API, the URL is: localhost:8080/apiman-echo
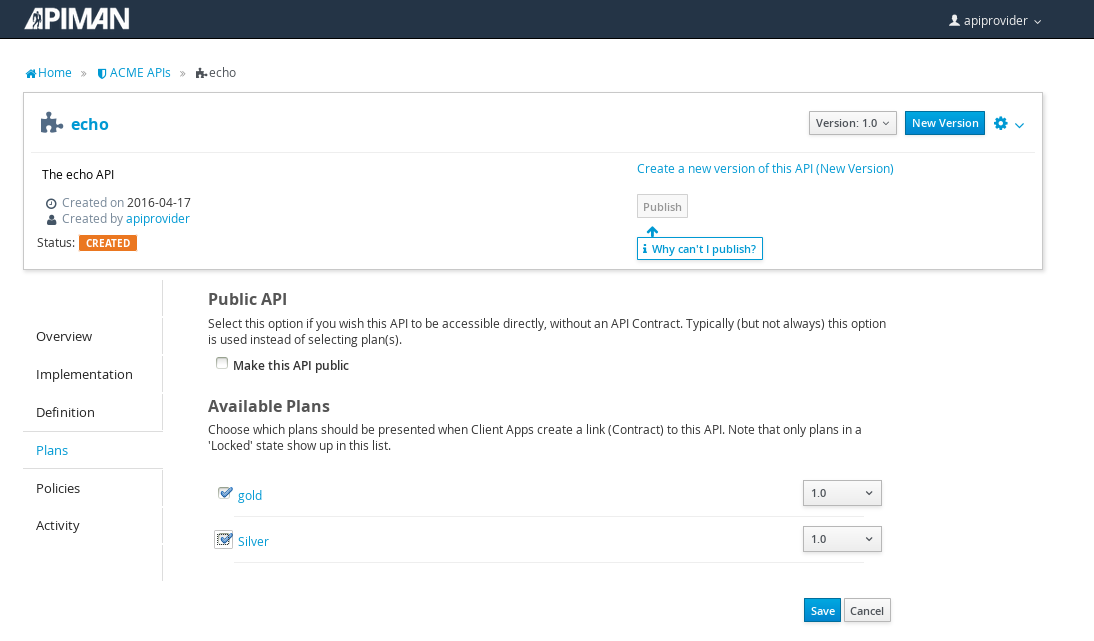
The plans tab shows which plans are available to be applied to the API:
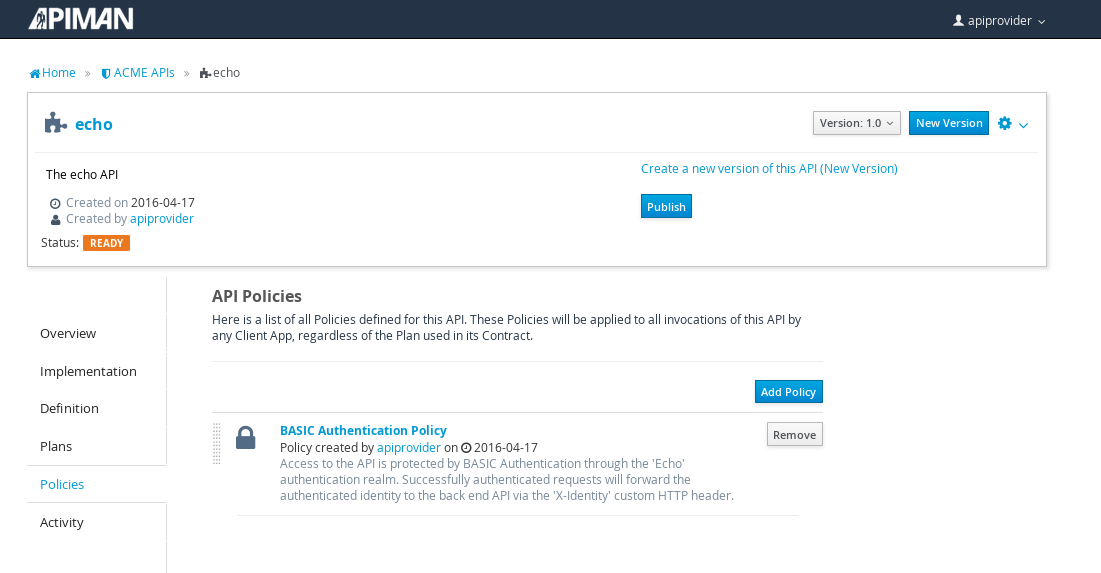
Let’s make our API more secure by adding an authentication policy that will require users to login before they can access the API. Select the Policies tab, and then define a simple authentication policy. Remember the user name and password that you define here as we’ll need them later on when send requests to the API.
After the authentication policy is added, we can publish the API to the API Gateway:
And, here it is, the published API:
OK, that finishes the definition of the API provider organization and the publication of the API.
Next, we’ll switch over to the API consumer side and create the API consumer organization and register an application to connect to the managed API through the proxy of the API Gateway.
The API Consumer Organization
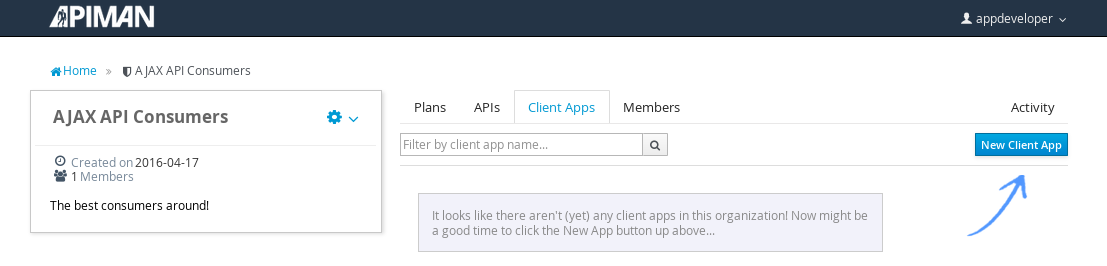
We’ll repeat the process that we used to create the application development organization. Log in to the API Manager UI as the “appdev” user and create the organization:

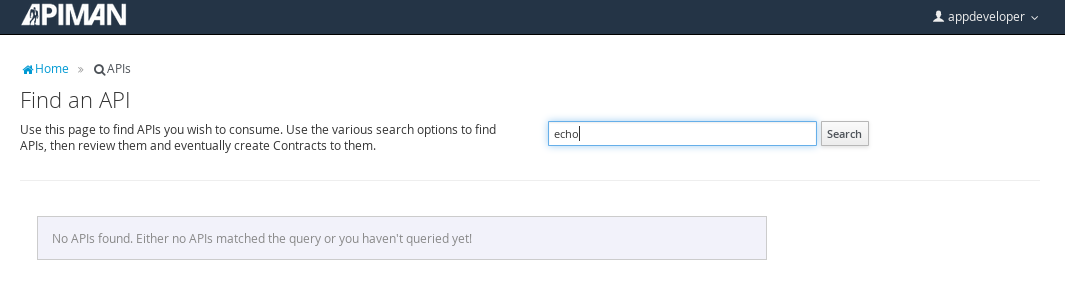
Unlike the process we used when we created the elements used by the API provider, the first step that we’ll take is to create a new application and then search for the API to be used by the application:
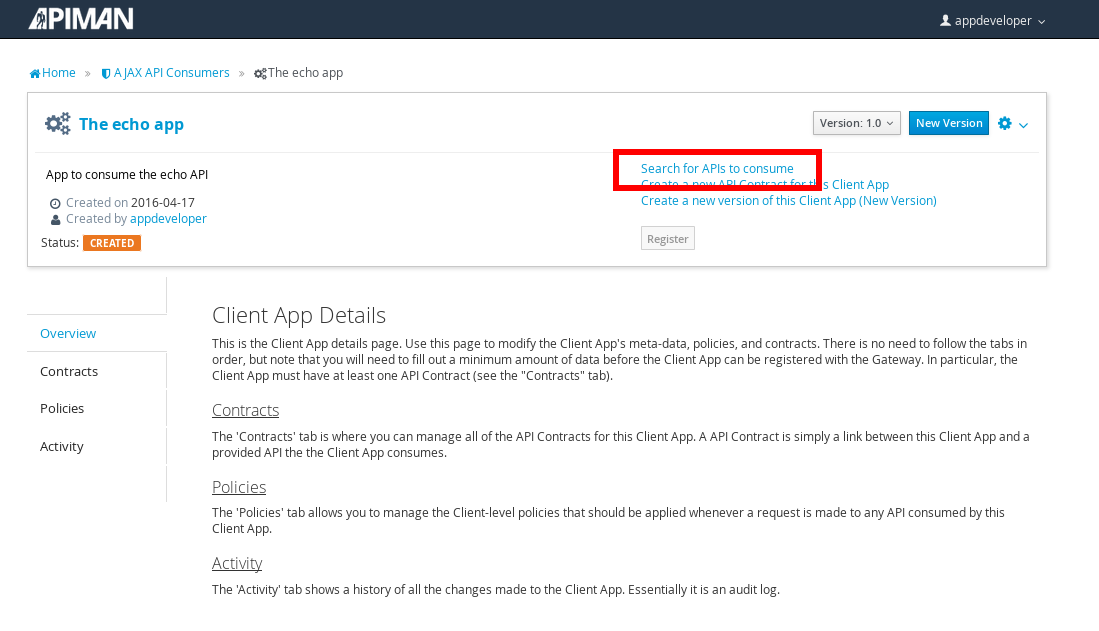
Searching for the API is easy, as we were careful to set the API name to something memorable:
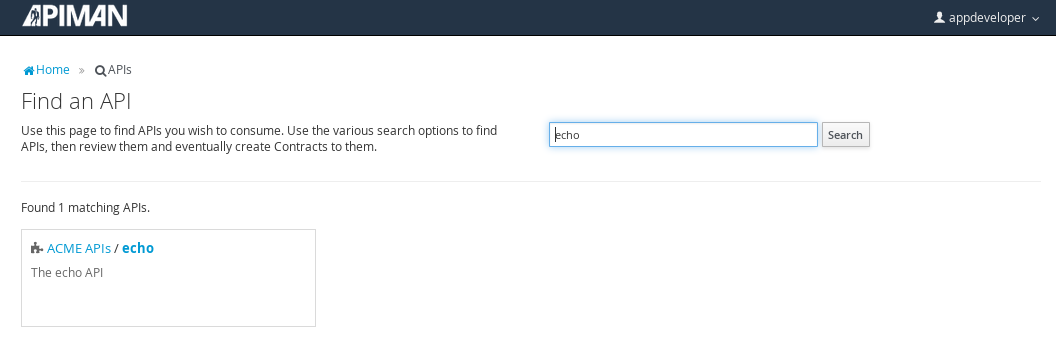
Select the API name, and then specify the plan to be used. We’ll splurge and use the gold plan:
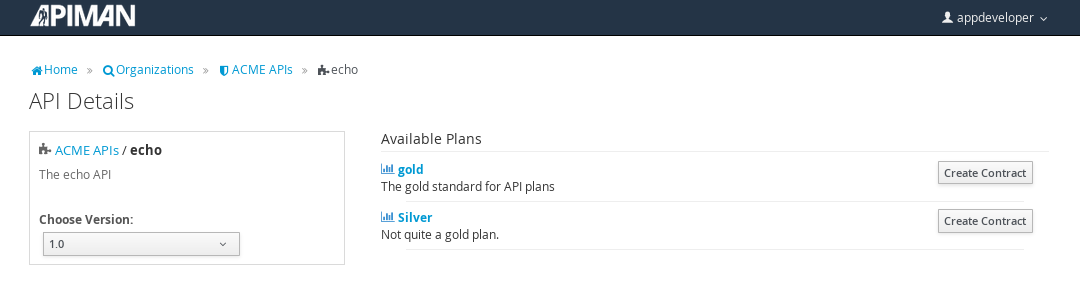
Next, select “create contract” for the plan (for this example, we’ll just accept all the defaults):
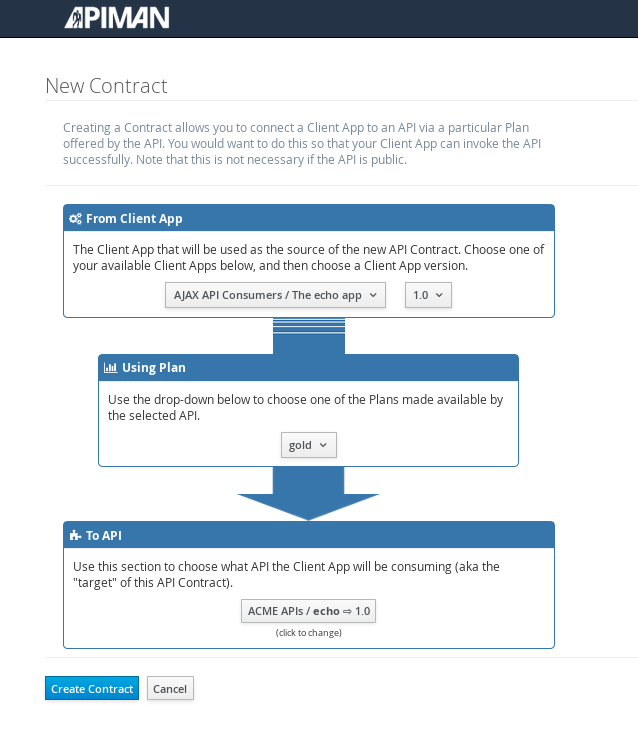
The last step is to register the application with the API Gateway so that the gateway can act as a proxy for the API:
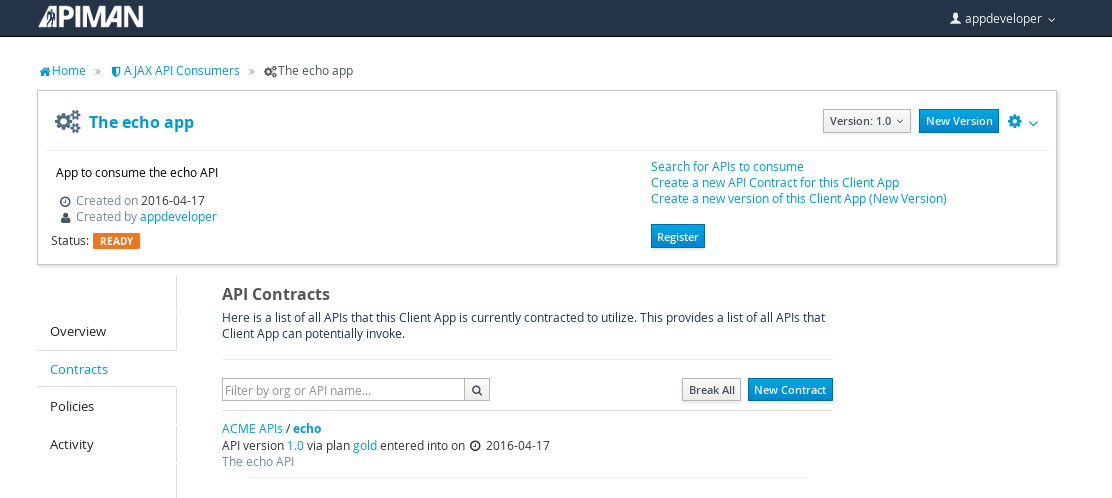
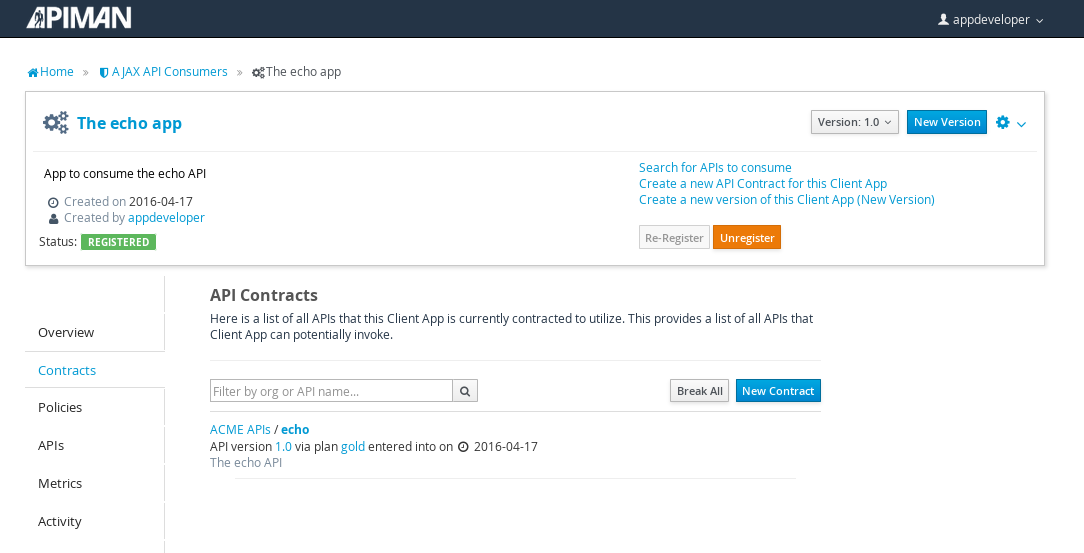
Congratulations! All the steps necessary to both provide and consume the configure the API are complete!
There’s just one more step that we have to take in order for clients to be able access the API through the API Gateway.
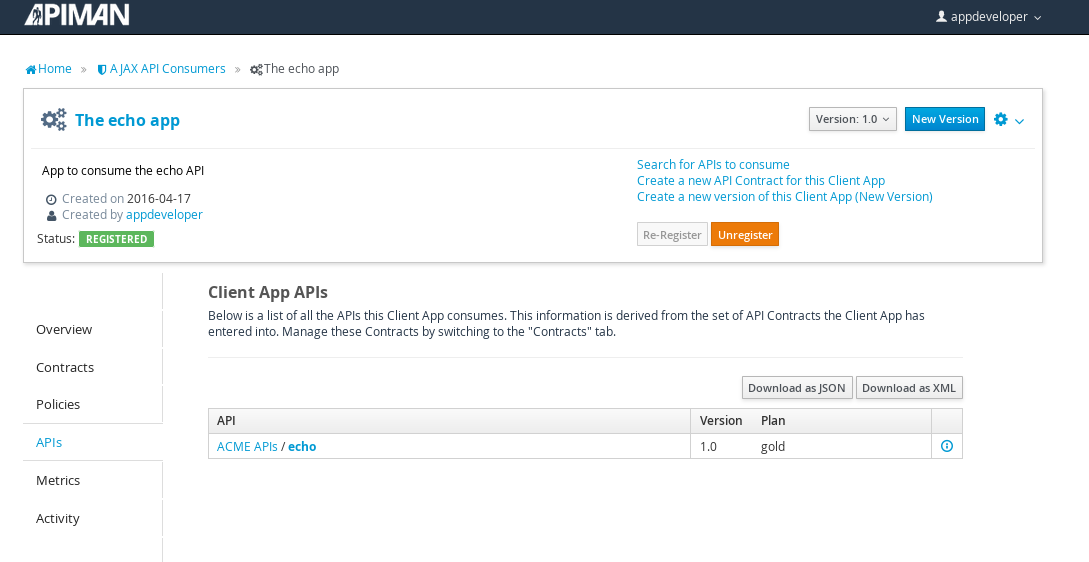
Remember the URL that we used to access the unmanaged API directly? Well, forget it. In order to access the managed API through the API Gateway acting as a proxy for other API we have to obtain the managed API’s URL. In the API Manager UI, header over to the “APIs” tab for the application, select the API and then click select on the “i” character to the right of the API name. This will expose the API Key and the API’s HTTP endpoint in the API Gateway:
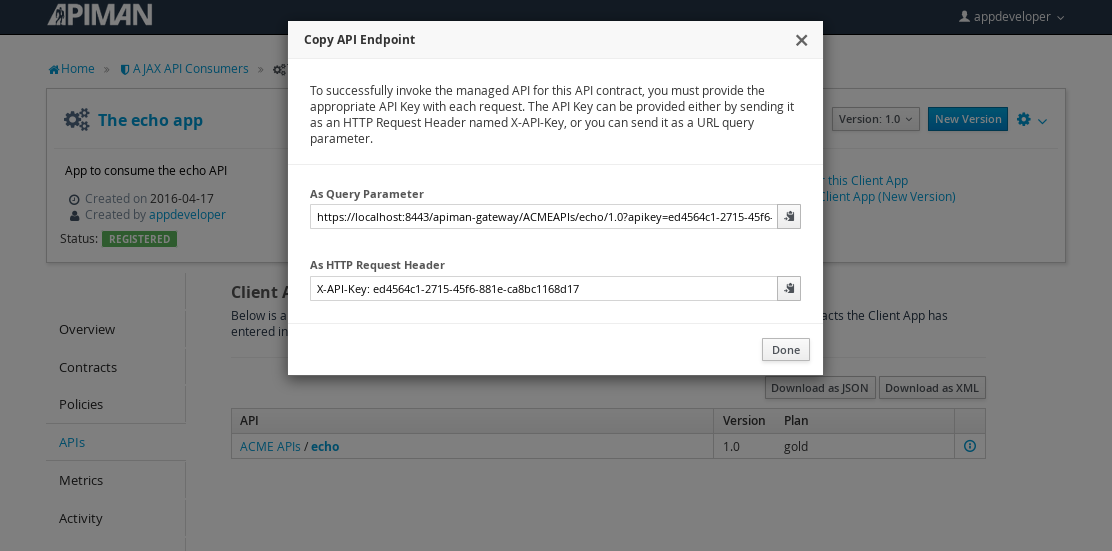
In order to be able access the API through the API Gateway, we have to provide the API Key with each request. combine the API Key and HTTP endpoint. The API Key can be provided either through an HTTP Header (X-API-Key) or a URL query parameter.
In our example, the API request looks like this:
https://localhost:8443/apiman-gateway/ACMEAPIs/echo/1.0?apikey=ed4564c1-2715-45f6-881e-ca8bc1168d17Copy the URL into the clipboard.
Accessing the Managed API Through the Apiman API Gateway, Watching the Policies at Runtime
Thanks for hanging in there! The set up is done. Now, we can fire up the client and watch the policies in action as they are applied at runtime by the API Gateway.
Open a new browser window or tab, and enter the URL for the managed API.
What happens first is that the authentication policy is applied and a login dialog is then displayed:
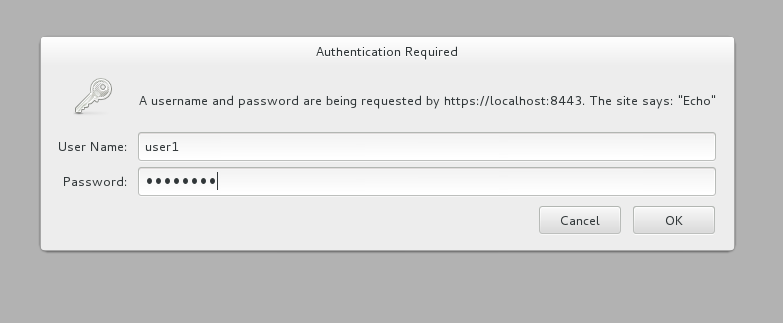
Enter the username and password (user1/password) that we defined when we created the authentication policy to access the API. The fact that you are seeing this dialog confirms that you are accessing the managed API and are not accessing the API directly.
When you send a GET request to the API, you should see a successful response:
{
 "method" : "GET",
 "resource" : "/apiman-echo",
 "uri" : "/apiman-echo",
 "headers" : {
	"Cookie" : "s_fid=722D028B20E49214-13EAE1456E752098; __utma=111872281.807845787.1452188093.1460777731.1460777731.4; __utmz=111872281.1452188093.1.1.utmcsr=(direct)|utmccn=(direct)|utmcmd=(none); _ga=GA1.1.807845787.1452188093; __qca=P0-404983419-1452188093717; __utmc=111872281",
	"Accept" : "text/html,application/xhtml+xml,application/xml;q=0.9,*/*;q=0.8",
	"User-Agent" : "Mozilla/5.0 (X11; Linux x86_64; rv:38.0) Gecko/20100101 Firefox/38.0",
	"Connection" : "keep-alive",
	"X-Identity" : "user1",
	"Host" : "localhost:8080",
	"Accept-Language" : "en-US,en;q=0.5",
	"Accept-Encoding" : "gzip, deflate",
	"DNT" : "1"
 },
 "bodyLength" : null,
 "bodySha1" : null
}
So far so good. Now, send 10 more requests and you will see a response that looks like this as the gold plan rate limit is exceeded:
{
   "type" : "Other",
   "headers" : {
      "empty" : false,
      "entries" : [
         {
            "X-RateLimit-Remaining" : "-1"
         },
         {
            "X-RateLimit-Reset" : "50904"
         },
         {
            "X-RateLimit-Limit" : "10"
         }
      ]
   },
   "failureCode" : 10005,
   "message" : "Rate limit exceeded.",
   "responseCode" : 429
}
And there it is. Your gold plan has been exceeded. Maybe next time you’ll spend a little more and get the platinum plan! ;-)
Let’s recap what we just accomplished in this demo:
-
We installed Apiman onto a WildFly server instance.
-
We used git to download and maven to build a sample REST client.
-
As an API provider, we created an organization, defined policies based on API use limit rates and user authentication, and a plan, and assigned them to an API.
-
As an API consumer, we searched for and found that API, and assigned it to an application.
-
As a client, we accessed the API and observed how the API Gateway managed the API.
And, if you note, in the process of doing all this, the only code that we had to write or build was for the client. We were able to fully configure the API, policies, plans, and the application in the API Manager UI.
Section 7 - Apiman Resources
-
Apiman site - www.apiman.io/
-
Apiman blog - www.apiman.io/blog/
-
Apiman downloads - www.apiman.io/latest/download.html
-
Apiman user guide, installation guide, & developer guide - www.apiman.io/apiman-docs/
-
Apiman videos - vimeo.com/user34396826
-
Apiman on GitHub - github.com/apiman/apiman
-
Apiman issues - github.com/apiman/apiman/issues
-
Apiman on Twitter - twitter.com/apiman_io