Apiman Production Guide
This guide should serve as an example of manually deploying Apiman into production.
Architecture Summary
Before we get started, it may be useful to know the overall architecture of Apiman.
Let’s start with a picture!
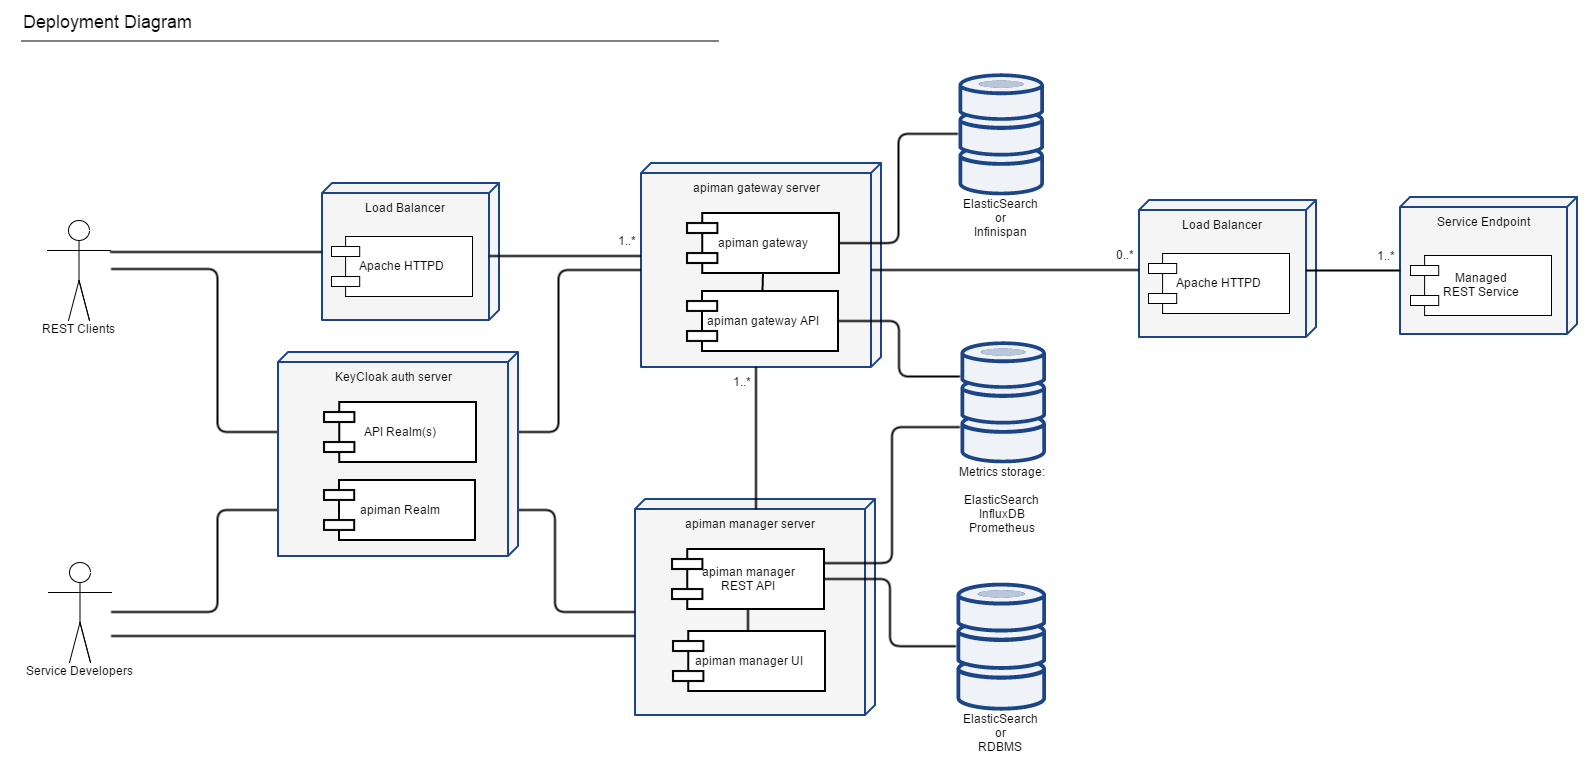
The Apiman solution is made up of a number of pieces, including:
-
Keycloak Authentication Server
-
Relational Database
-
Elasticsearch Datastore
-
Apiman API Gateway
-
Apiman API Manager
The image above should give you an idea of how they all fit together.
Auth: Keycloak
Once Keycloak is installed, you must configure the apiman realm.
This realm will be used for authentication into each of the Apiman components.
| You can configure additional Keycloak Realms for use with the Apiman "Keycloak OAuth2 Policy". |
Fortunately, Apiman comes with a realm file you can import. Please refer to: Keycloak setup guide for more information about importing a realm and setting up keycloak.
For a production setup, you should:
-
Change the client redirect URLs to be specific to your organisation’s endpoints
-
Use signed certificates and/or generate your own. Do not use the defaults.
-
Regenerate any client secrets.
-
Review account permissions, signup settings, and other security procedures. For example, the default realm would anyone to sign up without verifying their email address.
|
Database: PostgreSQL
In this example, we’ll use PostgreSQL for our production database.
After installing Postgres, create a database called apiman, and a corresponding service account sa_apiman.
Apiman ships with a recent Postgres driver, which means you don’t need to install drivers or configure datasources.
As of Apiman 3, there is also support for automated Liquibase migrations. We just need to start Apiman with the right database settings, and Apiman will wire everything up.
./bin/standalone.sh -c standalone-apiman.xml \
    -Dapiman.db.url="jdbc:postgresql://<your database hostname>:5432/apiman" \
    -Dapiman.db.username=postgres \
    -Dapiman.db.password="admin123\!" \
    -Dapiman.db.driver=postgresql11
Please refer to our database configuration guide for more information.
Metrics: Elasticsearch
In this example, we’ll use Elasticsearch for metrics. Other implementations are available.
The Apiman API Gateway can store all metrics information in Elasticsearch, and the API Manager queries that data to present analytics information in the UI.
To get started, you will need to install and run Elasticsearch. We recommend you enable authentication, where possible. Please see the Elasticsearch documentation for how to install and configure it in production.
| The data in Elasticsearch is not backed up or stored in some other location; Elasticsearch is being used as the primary/canonical data store for the metrics information. You may wish to configure backup procedures. |
Please refer to our Elasticsearch configuration guide for more information.